
Clawder v1.1.0 — Next.js AI App Builder Platform with Marketplace
Next.js AI App Builder Platform with Integrated Marketplace
Clawder is a self-hosted Next.js application for building AI-assisted web and mobile app projects, managing model access, deploying generated projects, and publishing completed apps through an integrated marketplace.
Required External Services & Operational Costs
AI API Usage
OpenAI, Anthropic, and Google bill separately for model usage. Costs depend on the models you enable, prompt volume, context size, tool calls, and whether Swarm mode is used.
E2B Sandboxes
E2B charges for running sandbox time, including idle-but-running sandboxes. Hobby currently includes 20 concurrent sandboxes and a one-time $100 usage credit, not unlimited free runtime. Pausing preserves state and frees active capacity. Check E2B pricing for current allowances and charges.
Stripe Fees
Stripe accounts, Checkout payments, marketplace purchases, and payouts are subject to Stripe's own availability, onboarding, transaction fees, and payout rules.
Hosting & Platform Services
Budget for your VPS or hosting provider, Supabase, Resend email, and Vercel or Netlify usage if deployed apps exceed free-tier limits.
Indicative Monthly Cost Estimates
AI API Usage
Usage-based, separate provider accounts.
Estimate input and output tokens per model using its provider rates. Long contexts, repeated tool calls, and parallel agents increase usage. Platform credits are your own pricing unit, not provider credits.
E2B Sandboxes
Hobby: $0 base plus usage. Pro: $150/month base plus usage.
For an illustrative runtime-only estimate, 100 total running hours at the current default 2-vCPU/4-GiB rate cost about $16.56, before plan fees and credits. Concurrent capacity and total billable hours are different quantities.
Supabase
Plan fees plus applicable database, Storage, and bandwidth usage.
Marketplace ZIP downloads consume storage and egress. Budget for database and Storage backups separately. See Supabase pricing.
Resend Email
Budget for transactional email volume.
Verify your sending domain and check daily/monthly sending allowances. See Resend pricing.
Stripe
Country-, product-, and payment-method-dependent fees.
Account for payment processing, applicable subscription billing fees, refunds, and disputes. The platform's seller allocation does not eliminate provider fees. See Stripe pricing.
Complete User Journey (A to Z)
This section walks through the entire platform the way a real user experiences it — from creating an account, to building an app with the AI, deploying it, selling it on the marketplace, and buying apps from others. The steps are ordered top to bottom, and each one links to the section that covers it in depth.
Part 1 — Get Started
1. Create your account
Open the app and click Sign up. Register with email + password, Google, or GitHub.
- Use Forgot password to reset your password by email.
- Your first account is a normal user — promoting it to admin is a one-time manual database step.
Configure Google OAuth · GitHub OAuth · Create the first admin

2. Describe what you want to build
Type your app idea or pick a suggestion pill from the home prompt.
- Operation mode — choose Agent (single engineer), Swarm (parallel sub-agents), or Ask (question-answer only).
- Thinking toggle — enable deep reasoning for complex builds.
- Model picker — switch between enabled AI models mid-conversation.
- Compression — shrink context size to stay within token limits.
- Image attach — upload up to 4 images for reference or pixel-perfect cloning.
- Voice input — speak your prompt instead of typing.
- Suggestion pills — one-click predefined app ideas to get started instantly.
- Press Enter to create the project.
See AI Models & Chat Modes · Environment Variables · Context Compression
Part 2 — Build With the AI

3. Watch it build in the workspace
The project opens in the workspace with three panels side by side:
- Chat panel — streams the agent's plan and tool activity in real time over WebSockets.
- Code editor — shows every file the agent writes, with syntax highlighting.
- Preview pane — renders the app live as it evolves, updating on each change.
- Switch between Chat / Code / Preview views and resize the panels.
The agent's powers come from 33 Autonomous Tools · real-time transport in Nginx & Endpoints
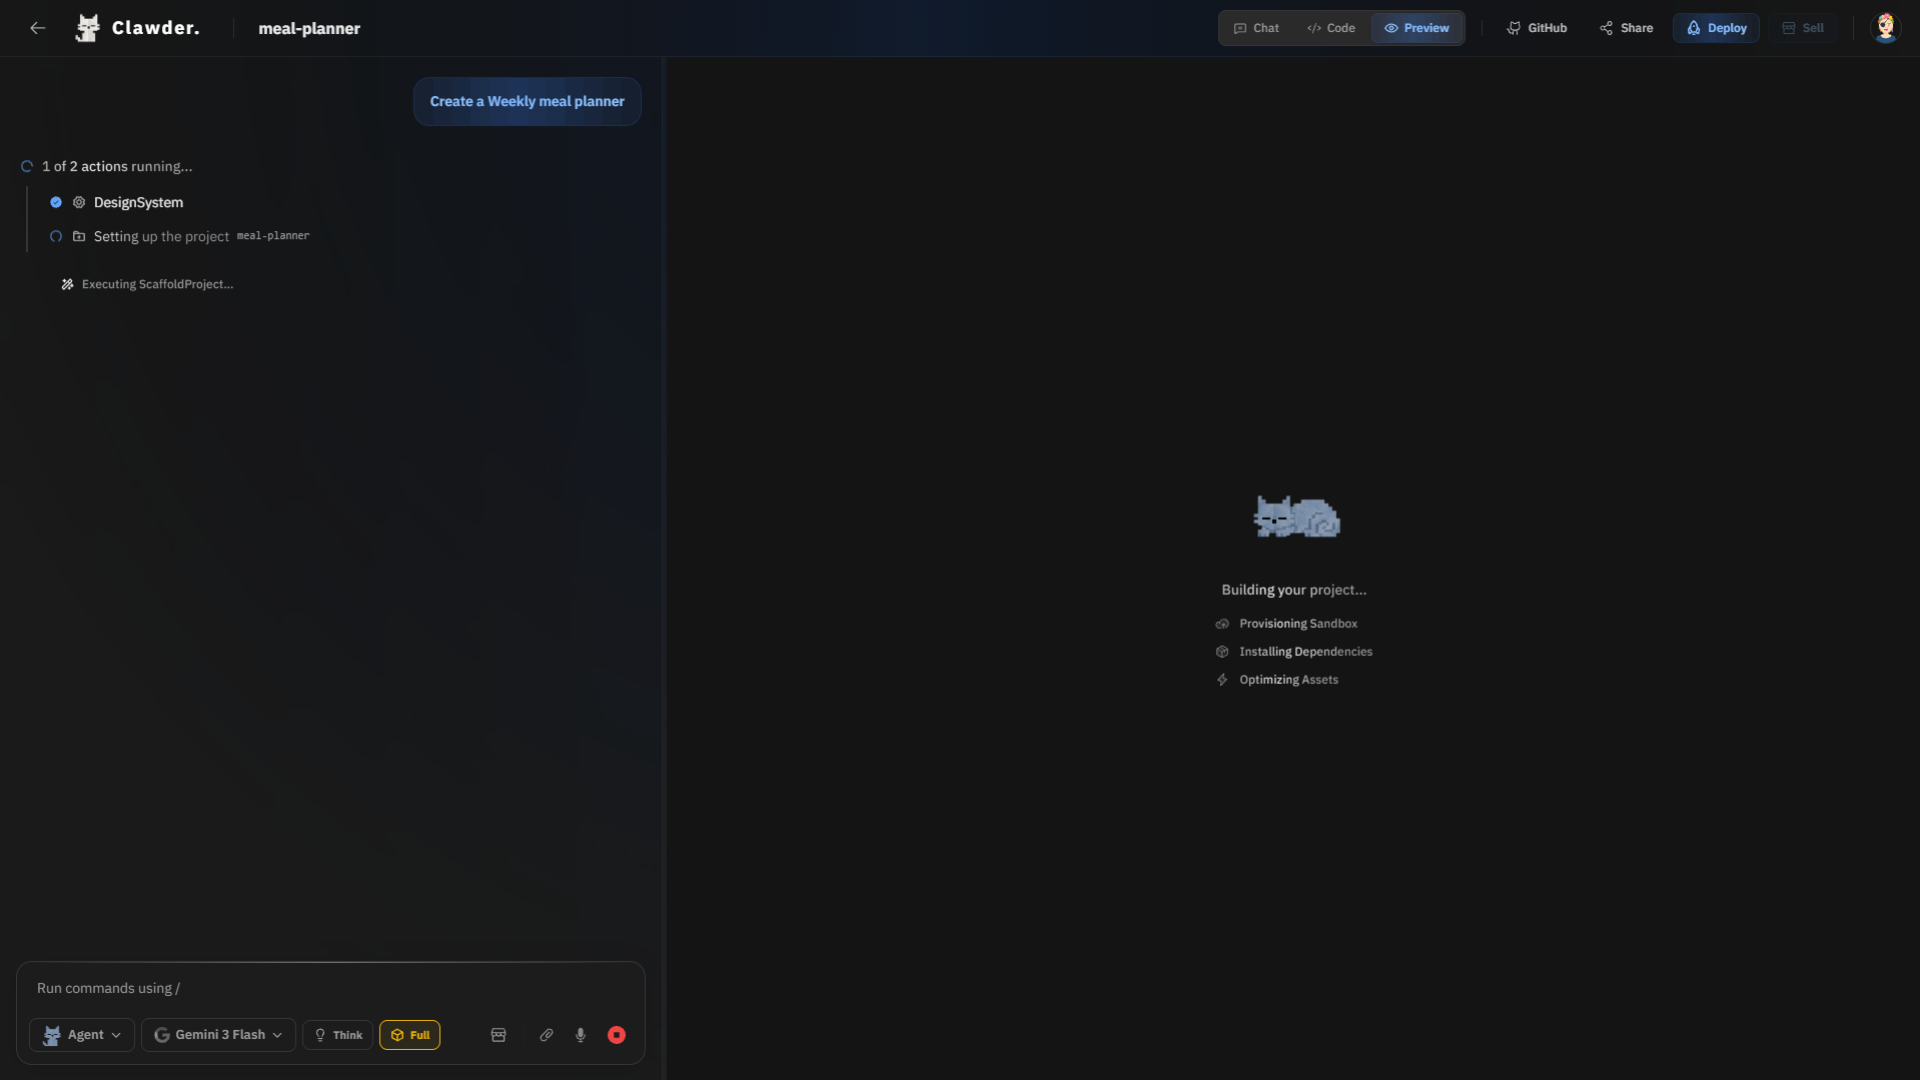
3a. Project creation in progress
While the agent builds, the workspace shows real-time progress:
- The agent's thought process and tool calls stream live in the chat panel.
- Files appear in the code editor as they are generated.
- The preview pane updates as soon as dependencies install and the app compiles.
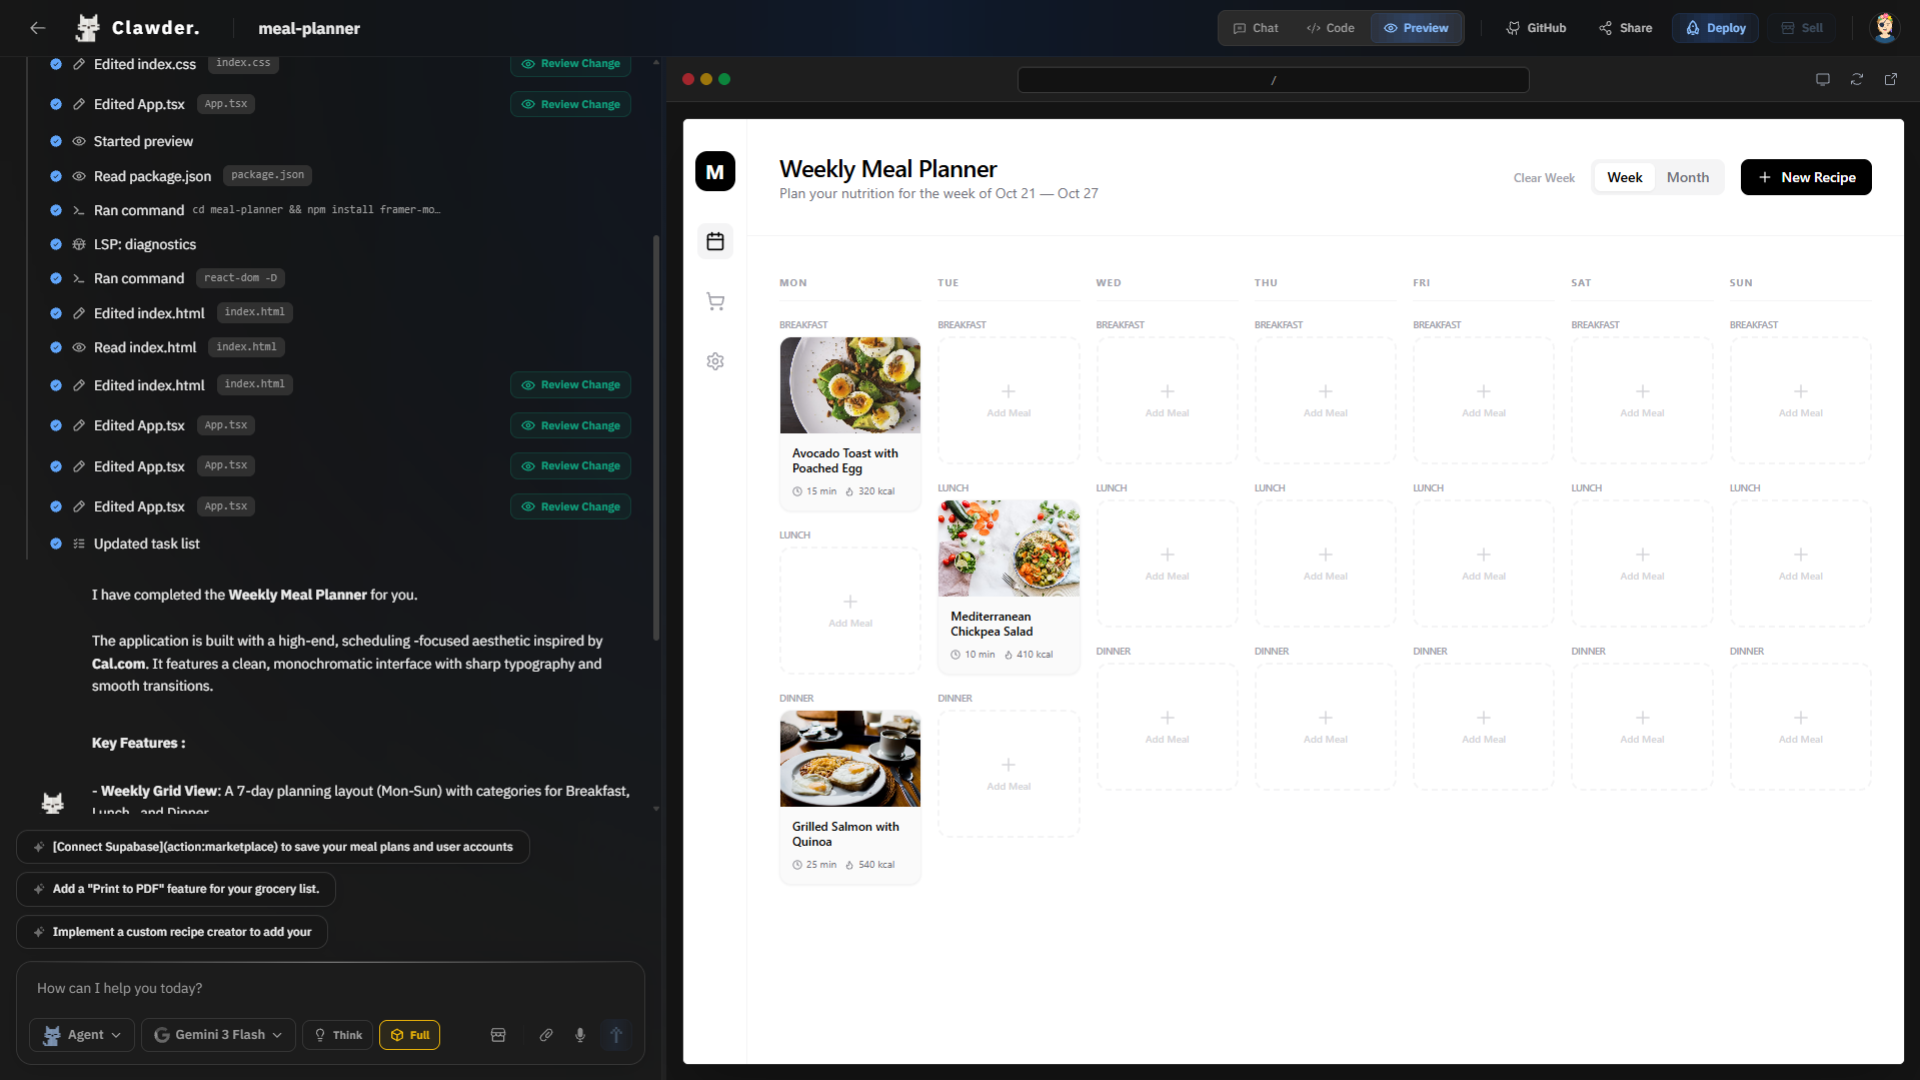
3b. Build complete — preview enabled
Once the agent finishes, the full preview is live and interactive:
- Click through the generated app as a real user would.
- Test every page, form, and feature the AI created.
- Iterate further by sending follow-up prompts in the chat.

4. Iterate with follow-up prompts
Keep chatting to refine the app. The agent applies each change and updates the preview live.
- Type a follow-up prompt to modify the app — the agent applies changes instantly.
- Each update rebuilds the preview so you see the result immediately.
- Use the / slash menu to browse available commands.
Full list in Slash Commands
5. Clone an existing design or import a repo
Use Clone to rebuild an app from a screenshot or a live URL, or Import to pull a project from a public GitHub repository.
- Clone — pixel-perfect mode is enabled automatically from a URL or screenshot.
- Import — paste any public GitHub repo URL and the agent recreates it.
- Both can be triggered from the action cards or the slash menu.

6. Extend the agent with MCP servers & skills
Connect external MCP servers to give the agent new capabilities and browse the skills library to enable advanced behaviors.
- Available MCP integrations: Supabase, GitHub, PostgreSQL, Puppeteer, Brave Search, Stripe, Figma, Redis, MongoDB, Slack, Linear, Notion, Google Drive, Firebase, PayPal, Postman, 21st.dev.
- Browse the skills library to enable pre-built advanced behaviors.
- Check MCP status at any time from the slash menu.
See MCP Integrations

6a. Skills & agent library
The skills library provides pre-built agent behaviors you can enable with one click:
- Browse available skills and their descriptions.
- Enable or disable skills per project.
- Each skill extends the agent's toolset with specialized capabilities.
7. Watch your credits & upgrade when needed
Every prompt consumes credits based on your plan's limits. When credits run out, or a mode or model is locked, the workspace shows an Upgrade modal.
- Credit usage is tracked per model and per session.
- The upgrade modal links directly to the pricing page.
- Plan limits are fully configurable in the Admin Panel > Plans section.
Part 3 — Ship & Share
8. Download the project
Grab a ZIP of the entire project directly from the workspace toolbar.
- ZIP excludes
node_modules,.git, build output, and development artifacts (.next,*.hot-update.*). - Instant full ownership of your code — no restrictions.
9. Sync to GitHub
Connect your GitHub account and repo from the workspace.
- Once connected, the agent operates on your live repository directly.
- Commit, inspect diffs, and revert from the chat.
- Push to remote with the sync action.
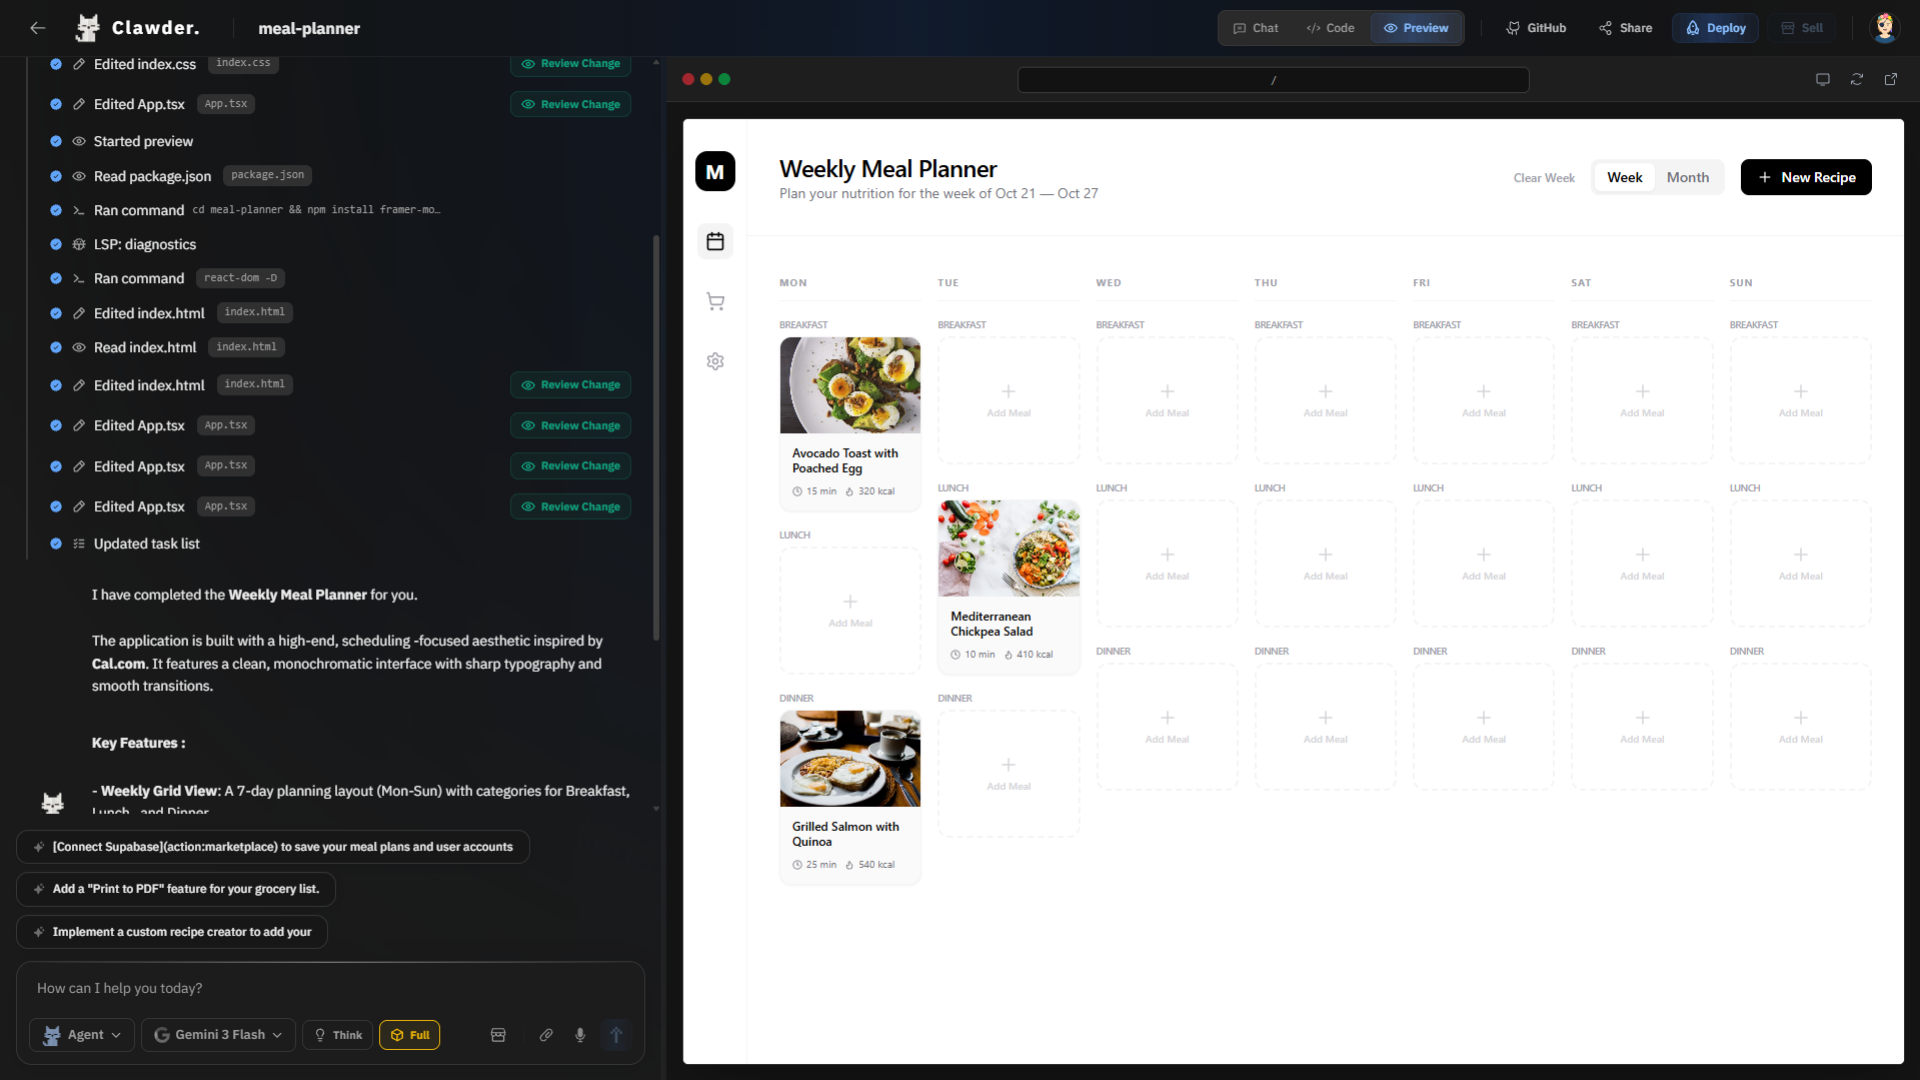
10. Deploy to Vercel or Netlify
Click Deploy in the workspace header to open the deploy modal.
- Choose personal Vercel or Netlify hosting, or Publish Website when managed publishing is configured.
- For personal hosting, enter your access token in the deployment dialog, never in chat.
- Vercel builds project source remotely; Netlify direct upload builds and uploads static output. The provider must report readiness before deployment is shown as successful.
See Build & Launch
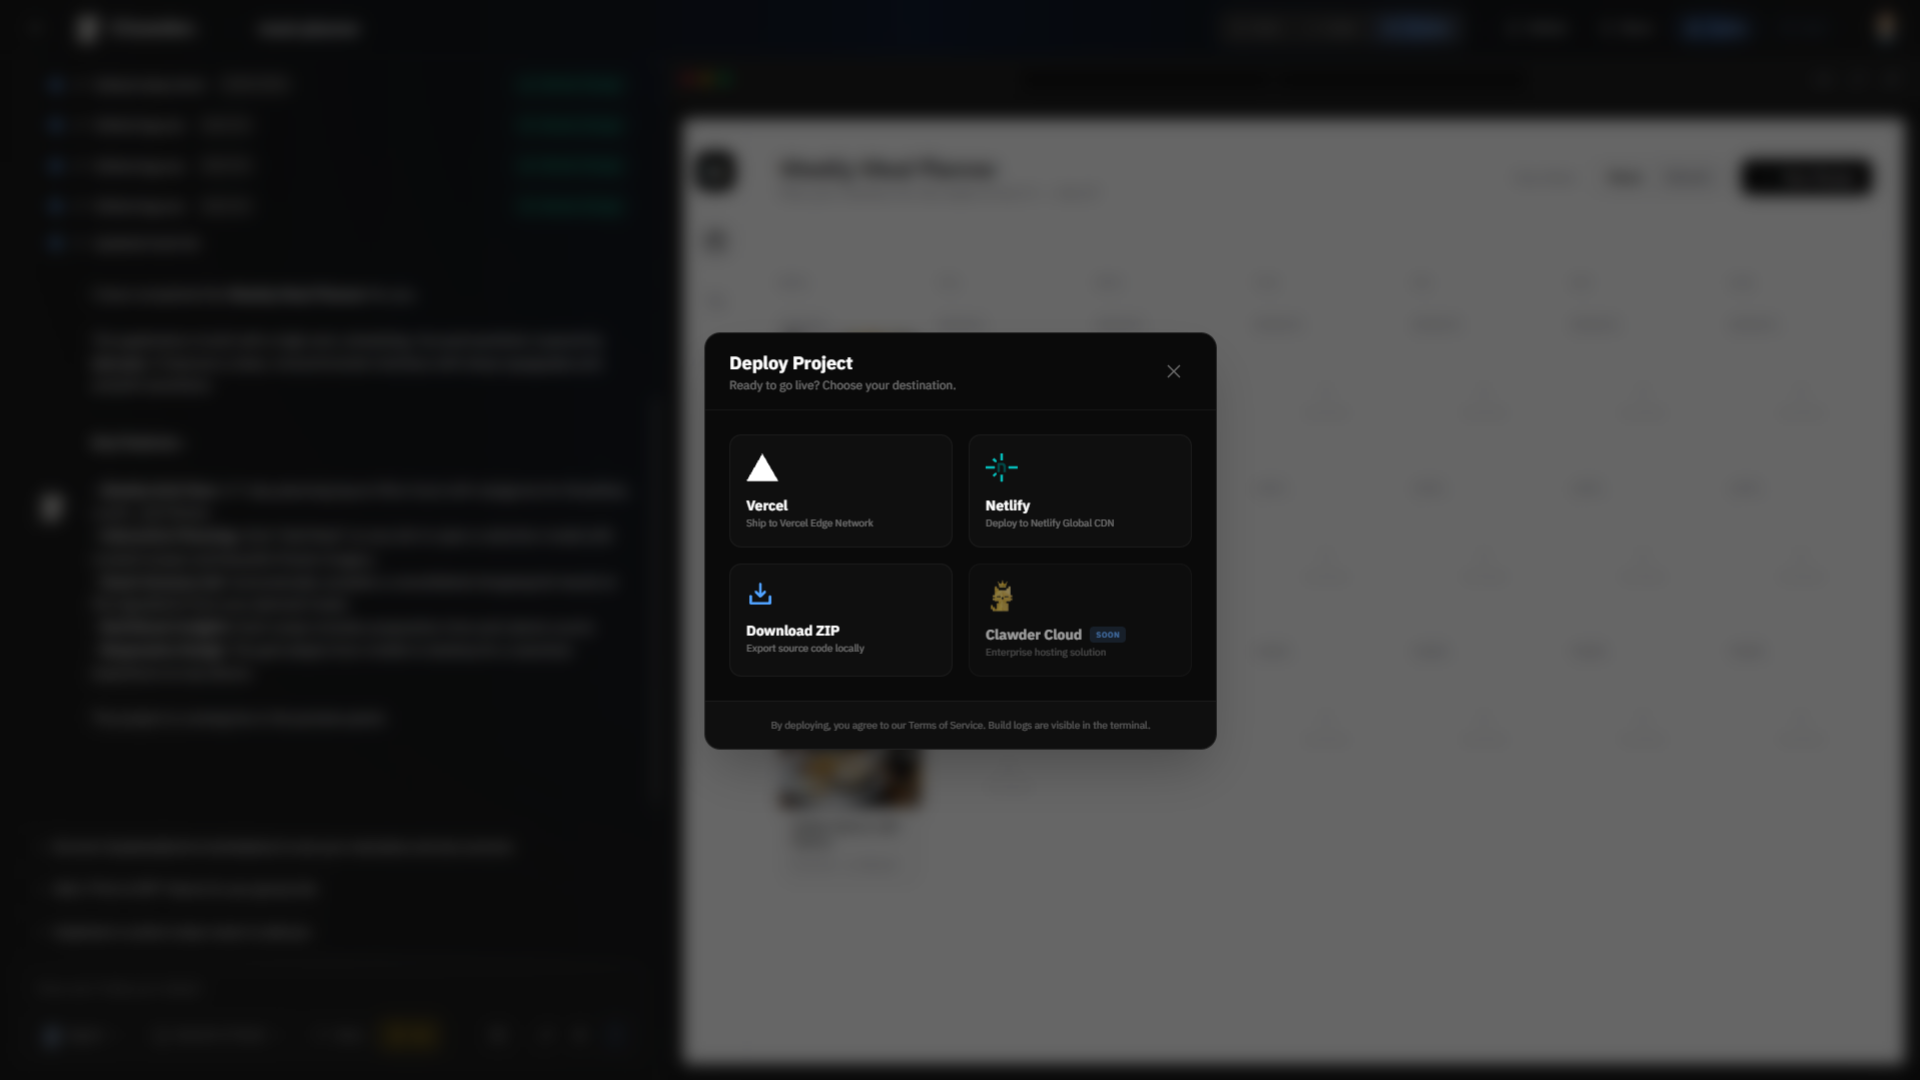
10a. Select deployment platform
The deploy modal lets you choose your hosting platform:
- Select the personal Vercel or Netlify option.
- Personal hosting requires a token with access to your target provider account. Managed Publish Website uses private operator credentials instead.
- Open your project in the builder first so its source sandbox is available. Browser editor contents are not used as an incomplete replacement for the source files.
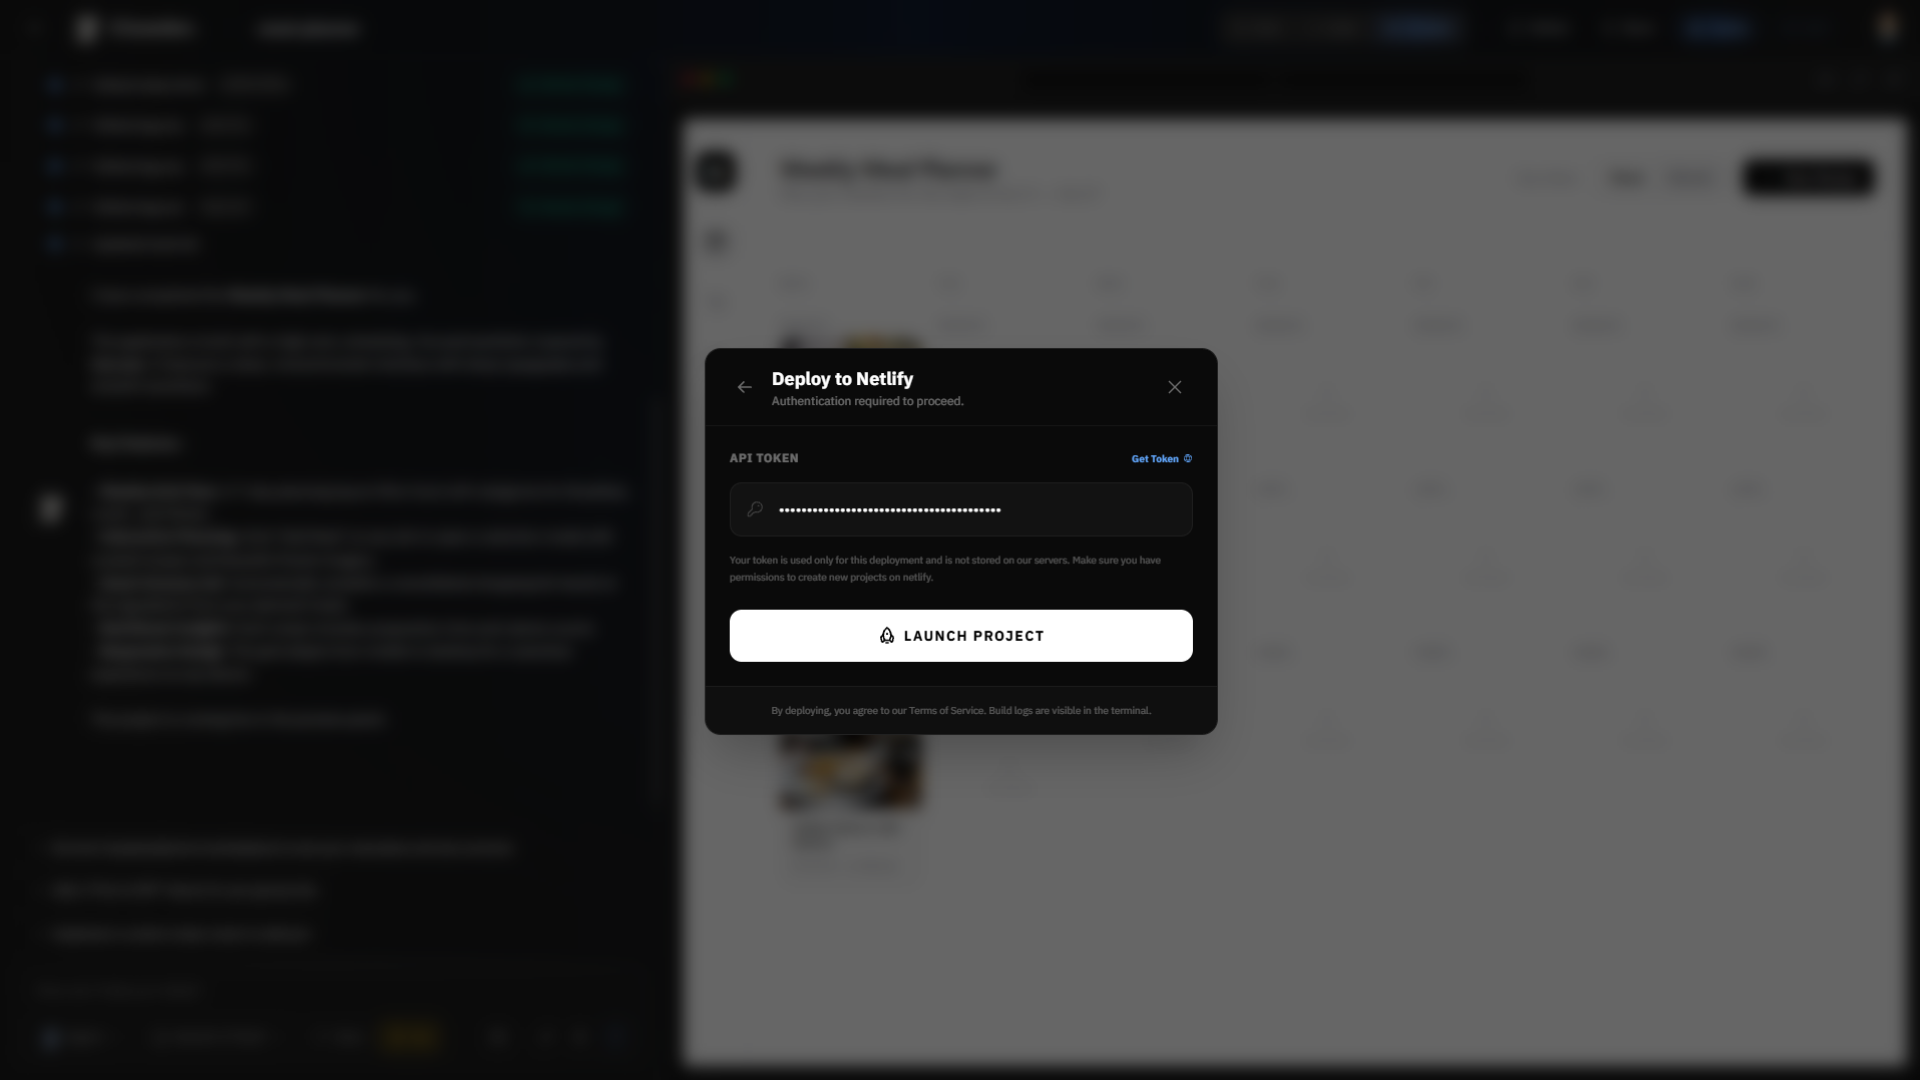
10b. Enter your access token
Paste your platform API key into the deploy modal:
- For Netlify: generate a personal access token in your Netlify account settings.
- For Vercel: create a token in your Vercel account settings under "Tokens".
- The personal token is remembered in this browser's local storage. This is not an encrypted credential vault; use a trusted device and clear site data to remove saved tokens.
- The backend holds the token in the active deployment session and supplies it privately to the deployment tool, not the AI prompt or tool arguments. Rotate tokens previously included in older chat transcripts.
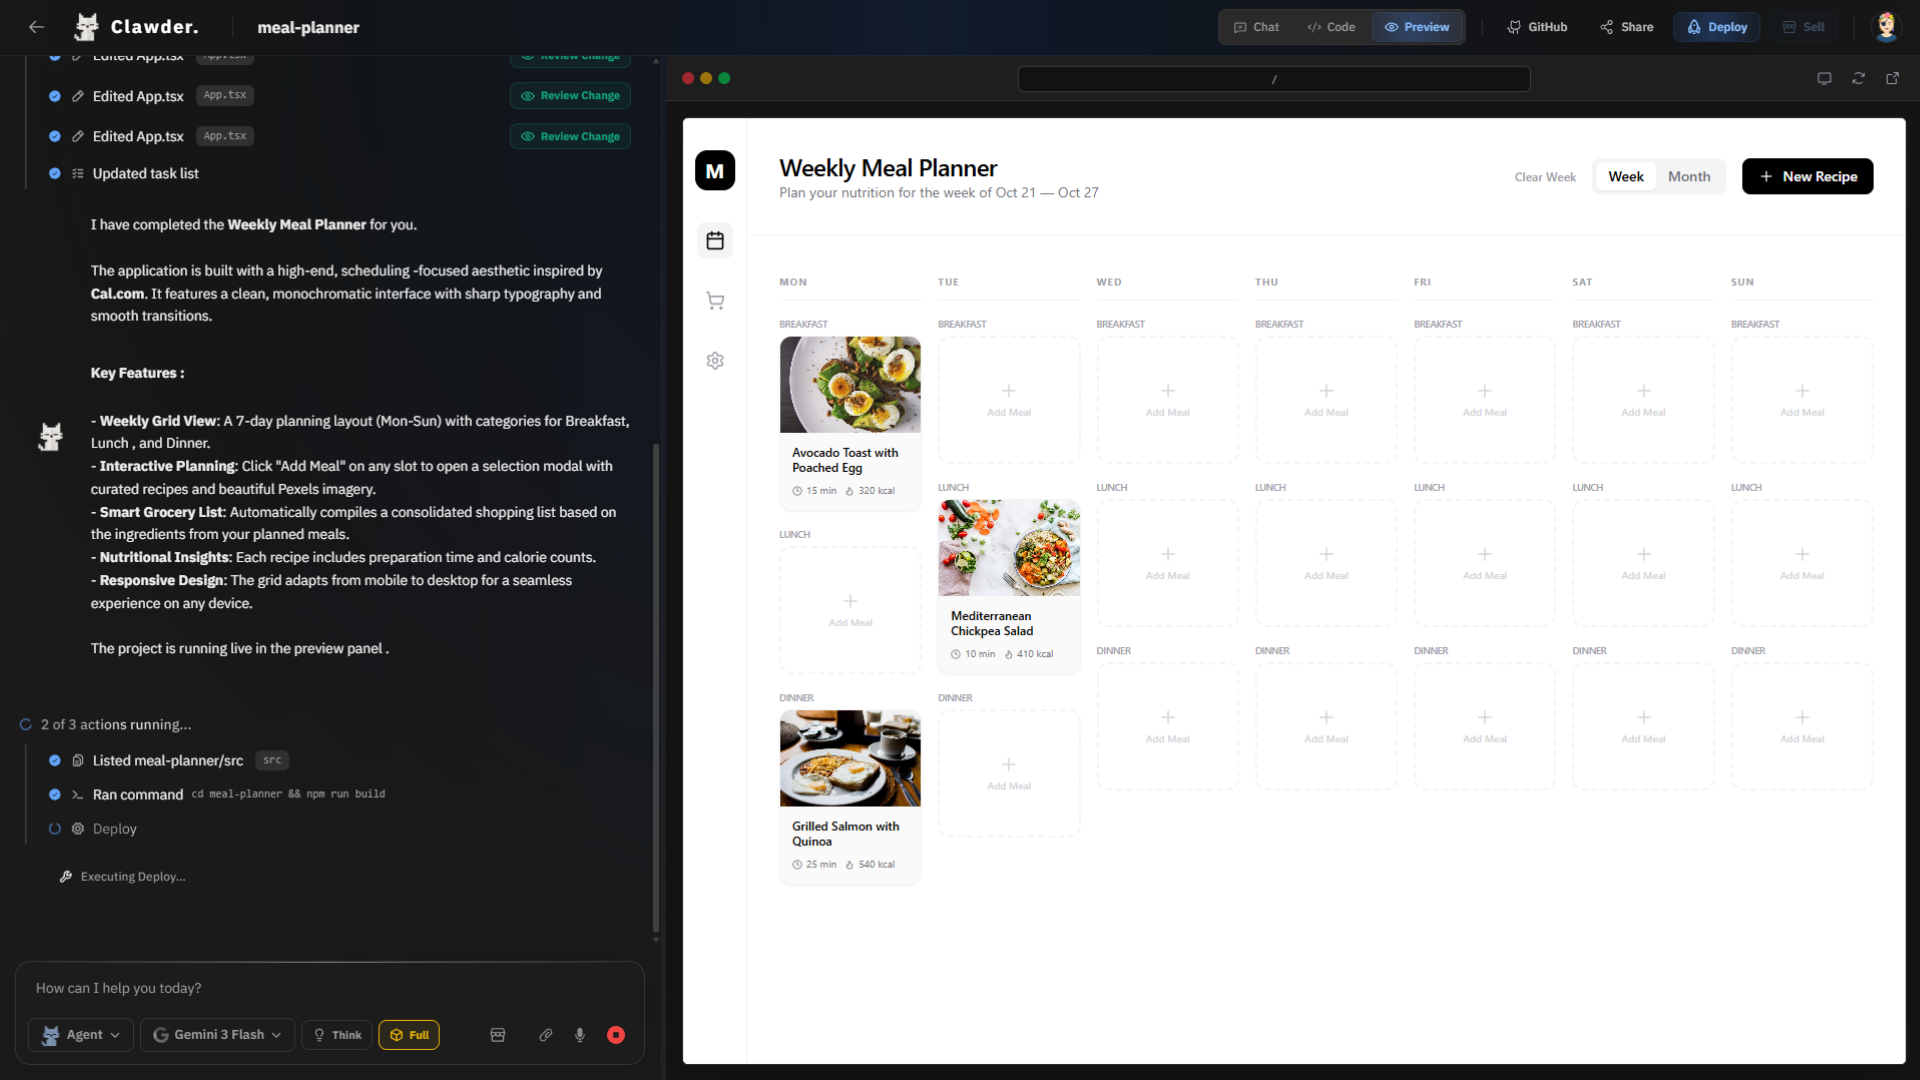
10c. Deployment in progress
While the deploy runs, the workspace shows real-time progress:
- The agent reports its deployment work in chat. Full remote Vercel build logs are available in the Vercel dashboard; Netlify static build failures are returned to the agent.
- Images and fonts are uploaded as binary files. Failed uploads and canceled builds cannot report success.
- If a build remains pending when polling ends, check the provider dashboard before retrying to avoid duplicate deployments.
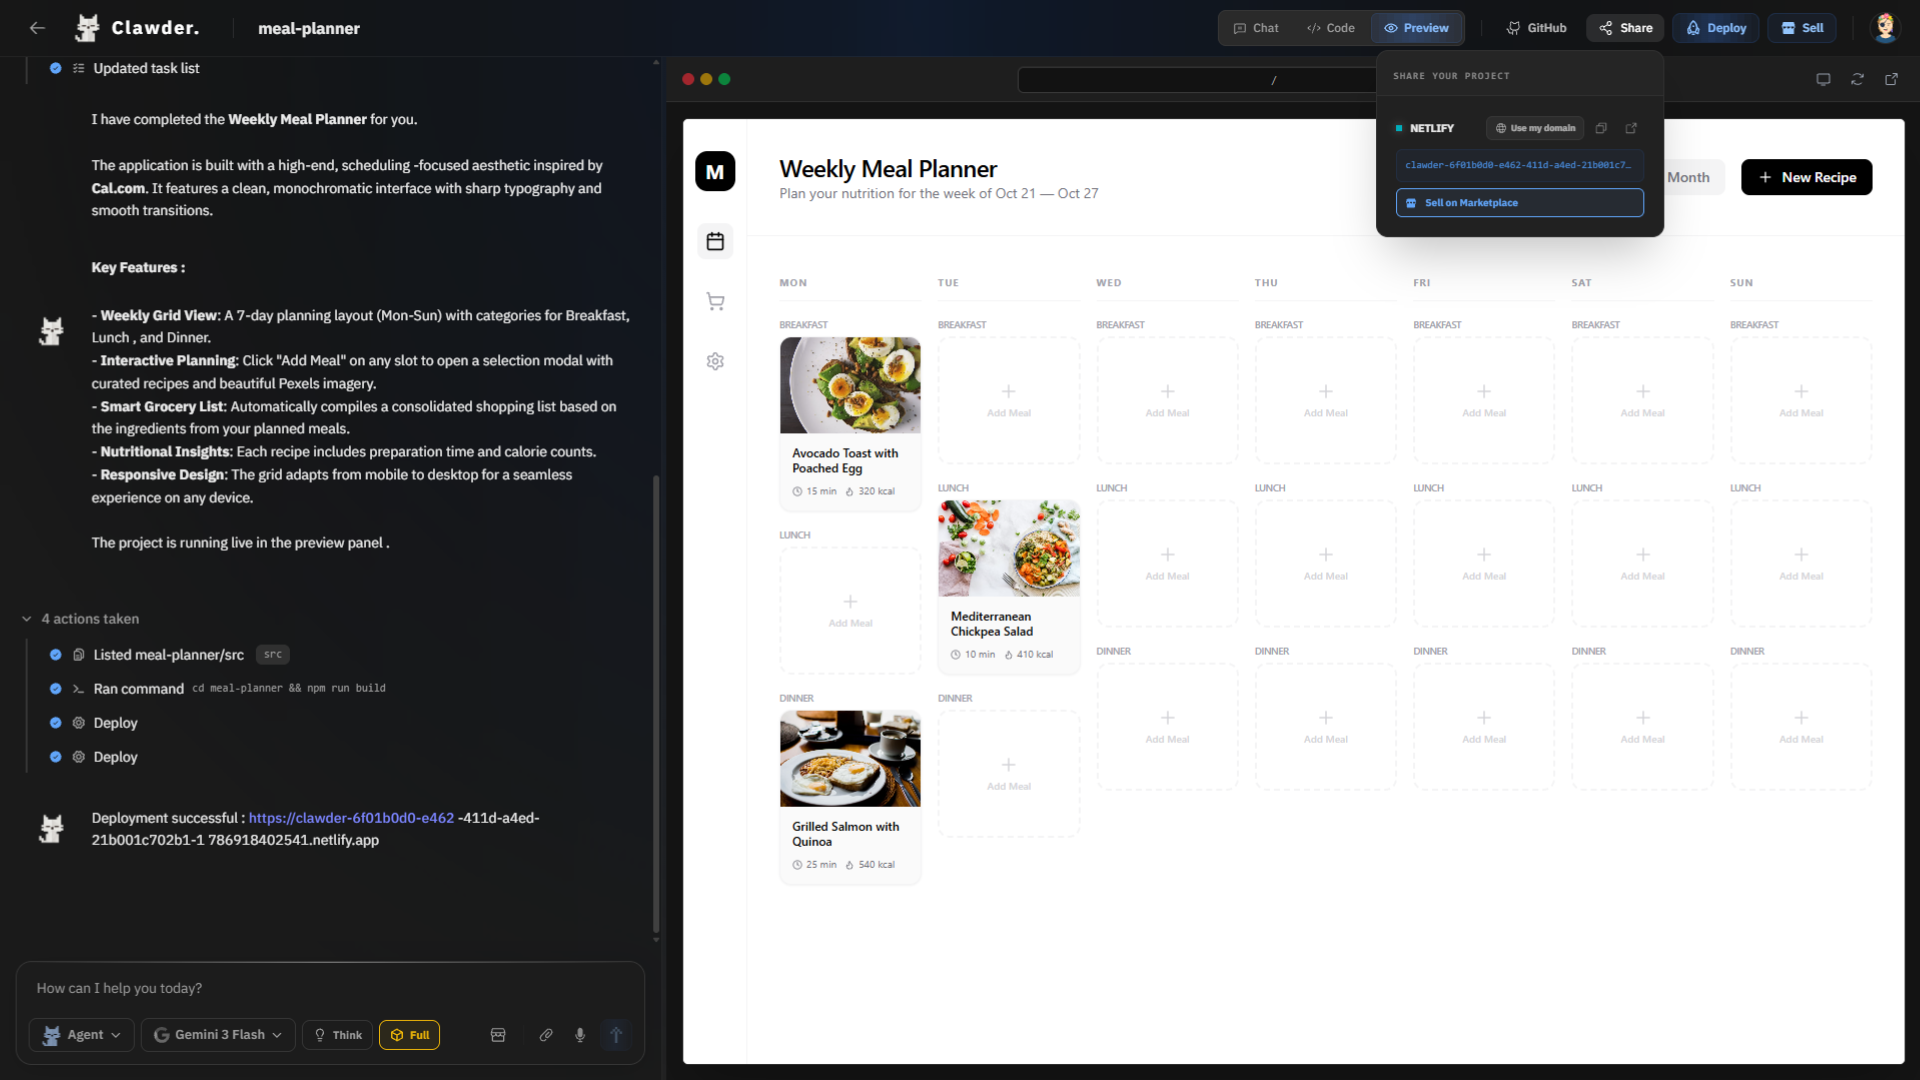
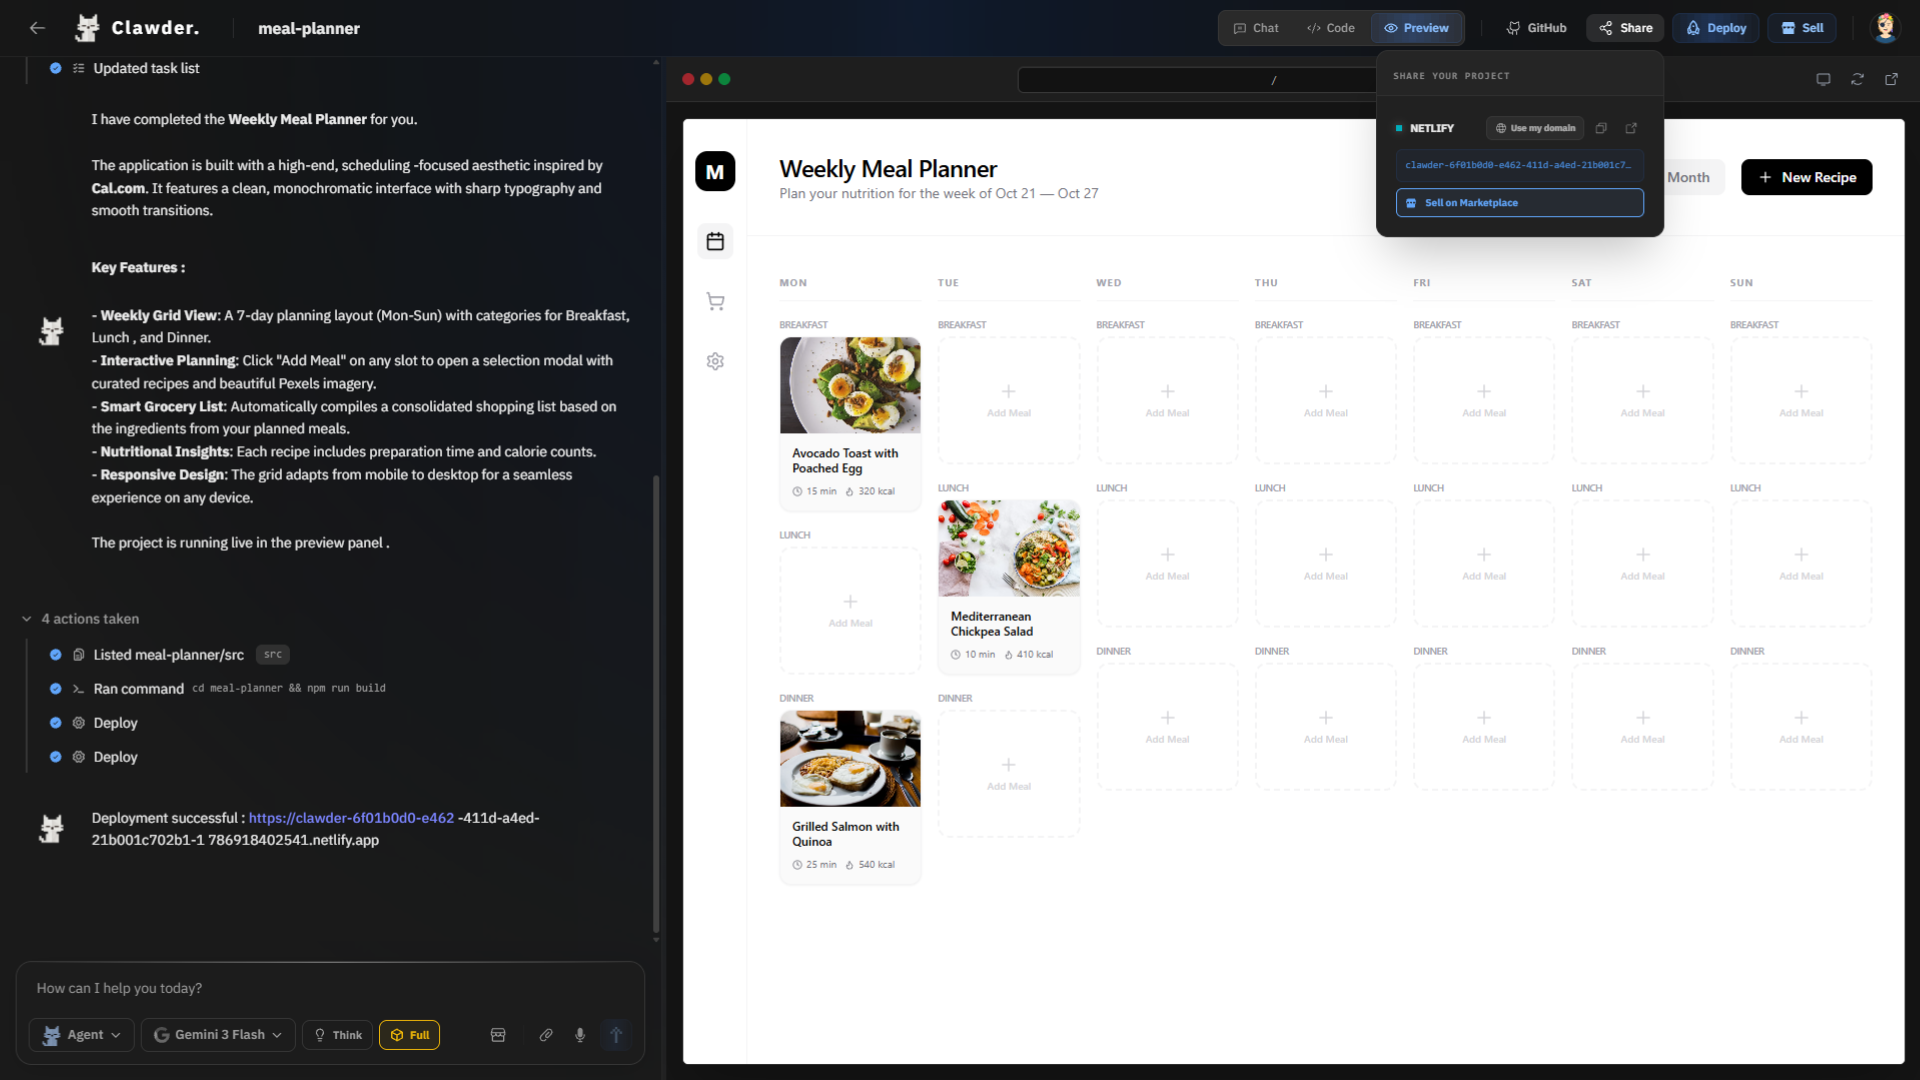
10d. Deployment successful
The deploy completes and the live URL is ready:
- The deployed URL appears in the workspace header.
- Click the link to open your live app in a new tab.
- The URL is ready to share or list on the marketplace.
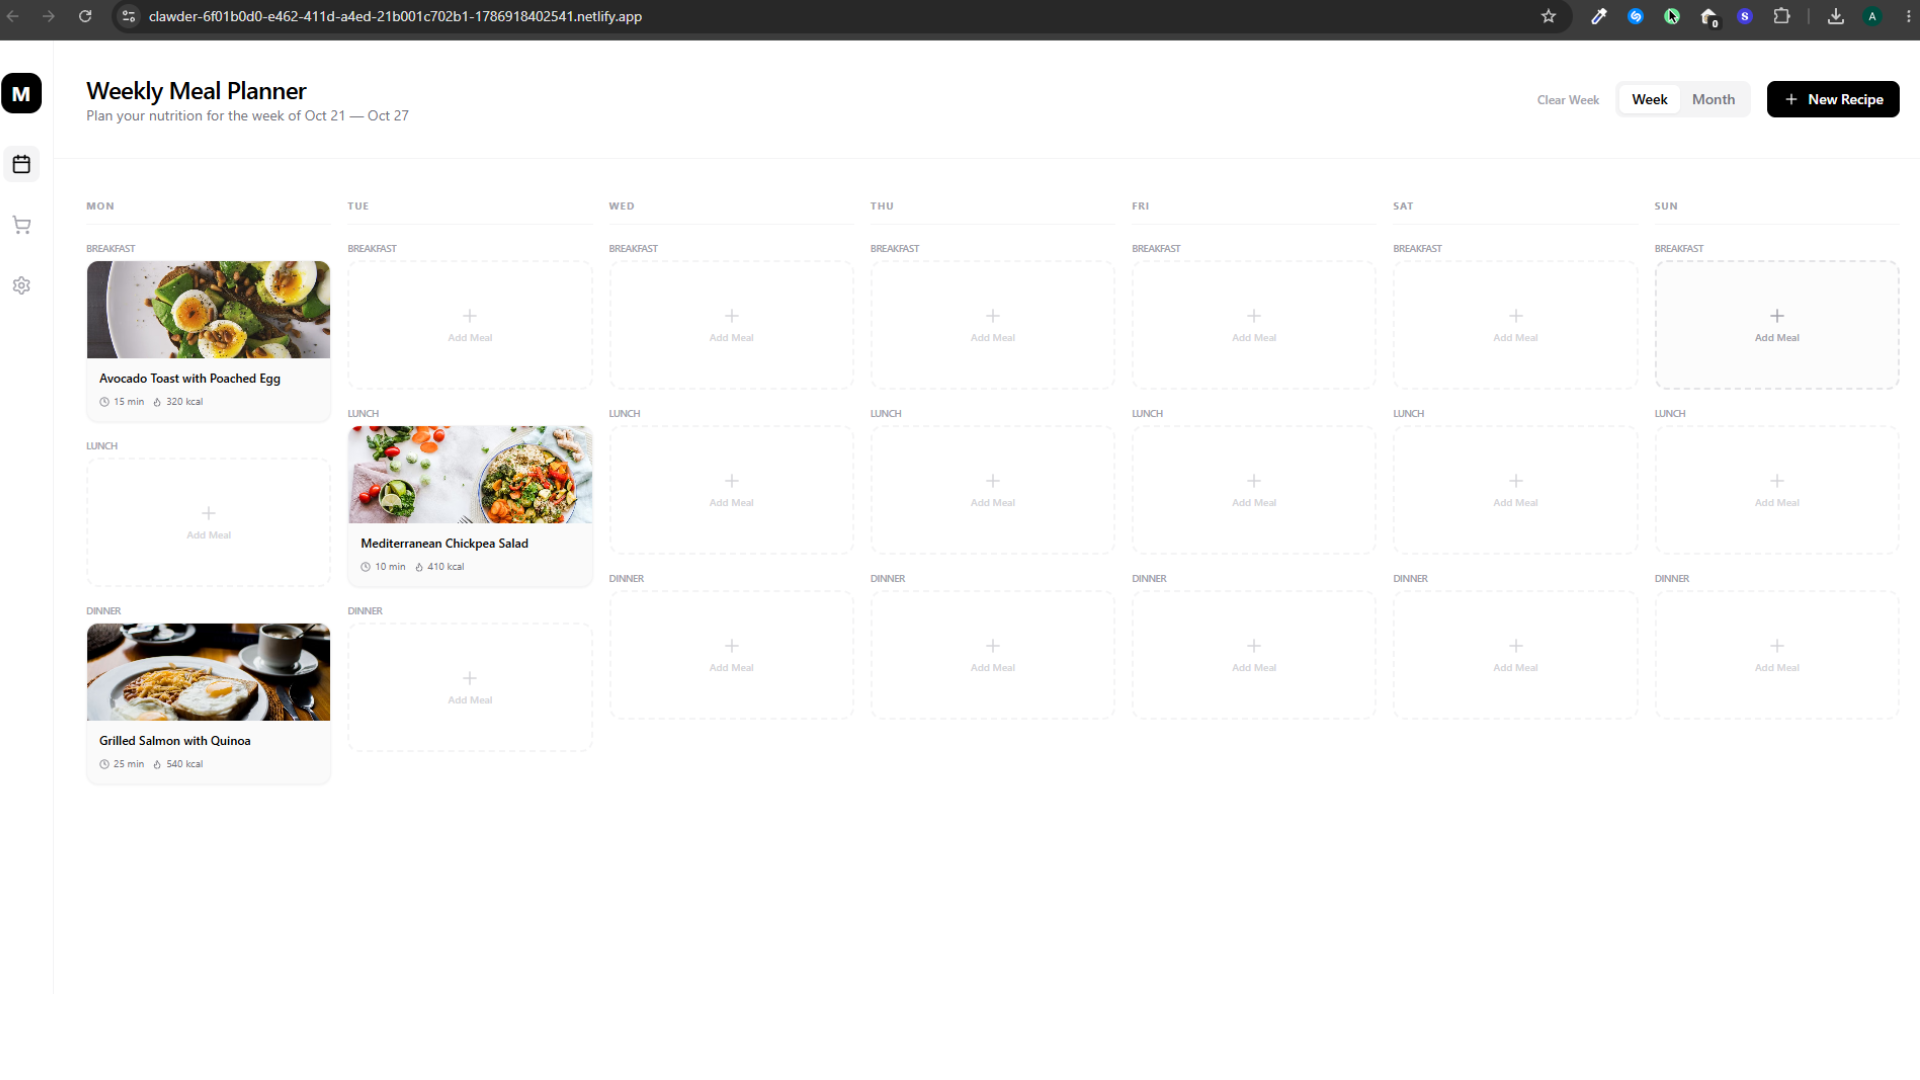
11. Share the live app
Copy the project share link or the deployed URL to show anyone the finished product.
- Click the deployed link to open it in a new tab.
- Share the URL with anyone — no login required to view.
- Deployed URLs also appear as demo links on marketplace listings.
Managed Website Publishing
Personal hosting compatibility
Personal Vercel deployments upload application source rather than compiled .next output, allowing the provider to build Next.js server-rendered apps. Personal Netlify direct upload requires static output with index.html at its root, normally in dist, build, or out. Next.js must use a static export in out for this Netlify path; server-rendered Next.js should use Vercel or a separate framework-aware Netlify setup. Configure production environment variables with the hosting provider: environment files and common credentials are excluded from uploads. Review generated code for embedded secrets.
As an alternative to personal hosting tokens, choose Publish Website in the deployment dialog. After operator setup, the project name generates an address such as fitness-tracker.your-publishing-domain.com. Duplicate names receive a short suffix. The address stays unchanged when the source project is renamed.
Vercel builds a filtered source snapshot, including binary images and fonts. Supported project roots are Next.js, Vite, and static HTML at /home/user. Published deployments are independent of E2B: pausing a sandbox or deleting its source project does not unpublish the website. Use Published Sites to check status, manage custom domains, or explicitly unpublish. Unpublishing removes the managed hosting project; it does not remove marketplace ZIP archives.
Operator configuration
Use a dedicated Vercel team, verify commercial-plan requirements, and configure a publishing domain you own. A separate domain from Clawder's login/admin domain is recommended. Set up wildcard DNS using Vercel's actual recommended records; wildcard certificate configuration may require Vercel nameservers. Add these private backend settings, never NEXT_PUBLIC_ settings:
VERCEL_MANAGED_TOKEN=YOUR_DEDICATED_TEAM_TOKEN
VERCEL_MANAGED_TEAM_ID=YOUR_VERCEL_TEAM_ID
PUBLISHING_BASE_DOMAIN=your-publishing-domain.com
PUBLISHING_MAX_SITES_PER_USER=5
PUBLISHING_MAX_BUILDS_PER_DAY=10
PUBLISHING_MAX_DOMAINS_PER_SITE=3
Check Admin > Publishing after restarting the backend. Configuration status confirms settings exist, not that DNS, permissions, billing, or HTTPS have passed a live acceptance test. Without the three required settings, managed publishing remains disabled. Follow supabase/managed-publishing.md in the source package for setup and verification. Existing installations must apply the updated upgrade SQL; fresh schema already includes the publishing tables.
Custom domains and verification
Publish first, add a hostname, and create the displayed _clawder-verification TXT record. This proves user ownership before a domain can be attached to the platform's team. Click Check DNS, then add the A/CNAME records and any additional TXT challenge returned by Vercel. DNS targets are not hardcoded. Root domains normally require A records; subdomains normally use CNAMEs. Vercel handles certificates; verify the website over HTTPS before announcing launch.
Limits and operating costs
Each source snapshot is limited to 2,000 files, 20 MB total, and 5 MB per file. Publishing attempts, including failed attempts, count toward the configurable per-user daily UTC quota. A two-minute cooldown applies per site. Hosting/build/bandwidth/function costs are separate provider charges. These quotas are not a platform-wide monetary cap: configure spending controls and monitoring with your provider. Source snapshots exclude dependencies, build output, symlinks, environment files, and common credentials, but application code must not contain embedded secrets. Application-specific deployed environment-variable management is not included in this first implementation. Demo admin publishing/domain mutations are blocked.
Deleting a source project preserves the website and its reserved capacity. Unpublish it to release capacity. Account deletion is blocked until its published websites are removed, preventing untracked hosting resources. This feature does not host generated production websites inside E2B or on the Clawder VPS.
Part 4 — Sell on the Marketplace
12. Publish your app as a listing
After deploying, the Publish to Marketplace button appears in the workspace. Click it to open the publish wizard.
- Fill in title, URL slug, description, category, technologies, and demo URL.
- Upload screenshots and choose whether to list the app as free or paid.
- Review everything before publishing — you can edit after going live.
See App Marketplace Setup · Database Tables · Persistent ZIP Delivery

12a. Open the publish wizard
Click the Sell button to open the marketplace publish modal:
- The modal pre-fills your project name and description.
- Choose a category and add technology tags.
- Set your price or list the app for free.

12b. Fill in description & tags
Complete the listing details:
- Write a compelling description for your app.
- Add technology tags so buyers can filter by stack.
- The slug auto-generates from the title — edit it if needed.

12c. Upload images & set pricing
Add screenshots and choose how to list your app:
- Upload preview images that showcase your app.
- Toggle between Free (instant download) or Paid (Stripe Checkout required).
- Set the price in your preferred currency.

12d. Review & publish
Review everything before going live:
- Preview how your listing will look on the marketplace.
- Click Publish Now to submit.
- The listing appears instantly in the marketplace — no manual review needed.

12e. Published to the marketplace
Your app is now live on the marketplace:
- Buyers can browse, preview, and purchase your app.
- Publishing saves a ZIP to private Supabase Storage, so buyers can download it even after the E2B sandbox is removed. No manual file upload is needed.
- The 30% platform fee is hardcoded in the source code — see Marketplace Setup to customize.
13. Manage sales & withdraw earnings
The author dashboard shows your balance, lifetime earnings, downloads, and seller badges.
- View your listings and payout history.
- Request a withdrawal via PayPal (min $50) or bank transfer (min $250).
- The operator reviews it under Admin > Payout Requests, sends the funds, and marks it as paid.

13a. Projects & revenue overview
The author dashboard shows your projects and their earnings at a glance:
- List of all your published marketplace listings.
- Revenue earned per project with lifetime totals.
- Download count and rating per listing.

13b. Payout history
Track all your past withdrawals:
- See every payout request you've made with status (pending, paid, rejected).
- View amounts, dates, and payment method used.
- Export payout history for your records.
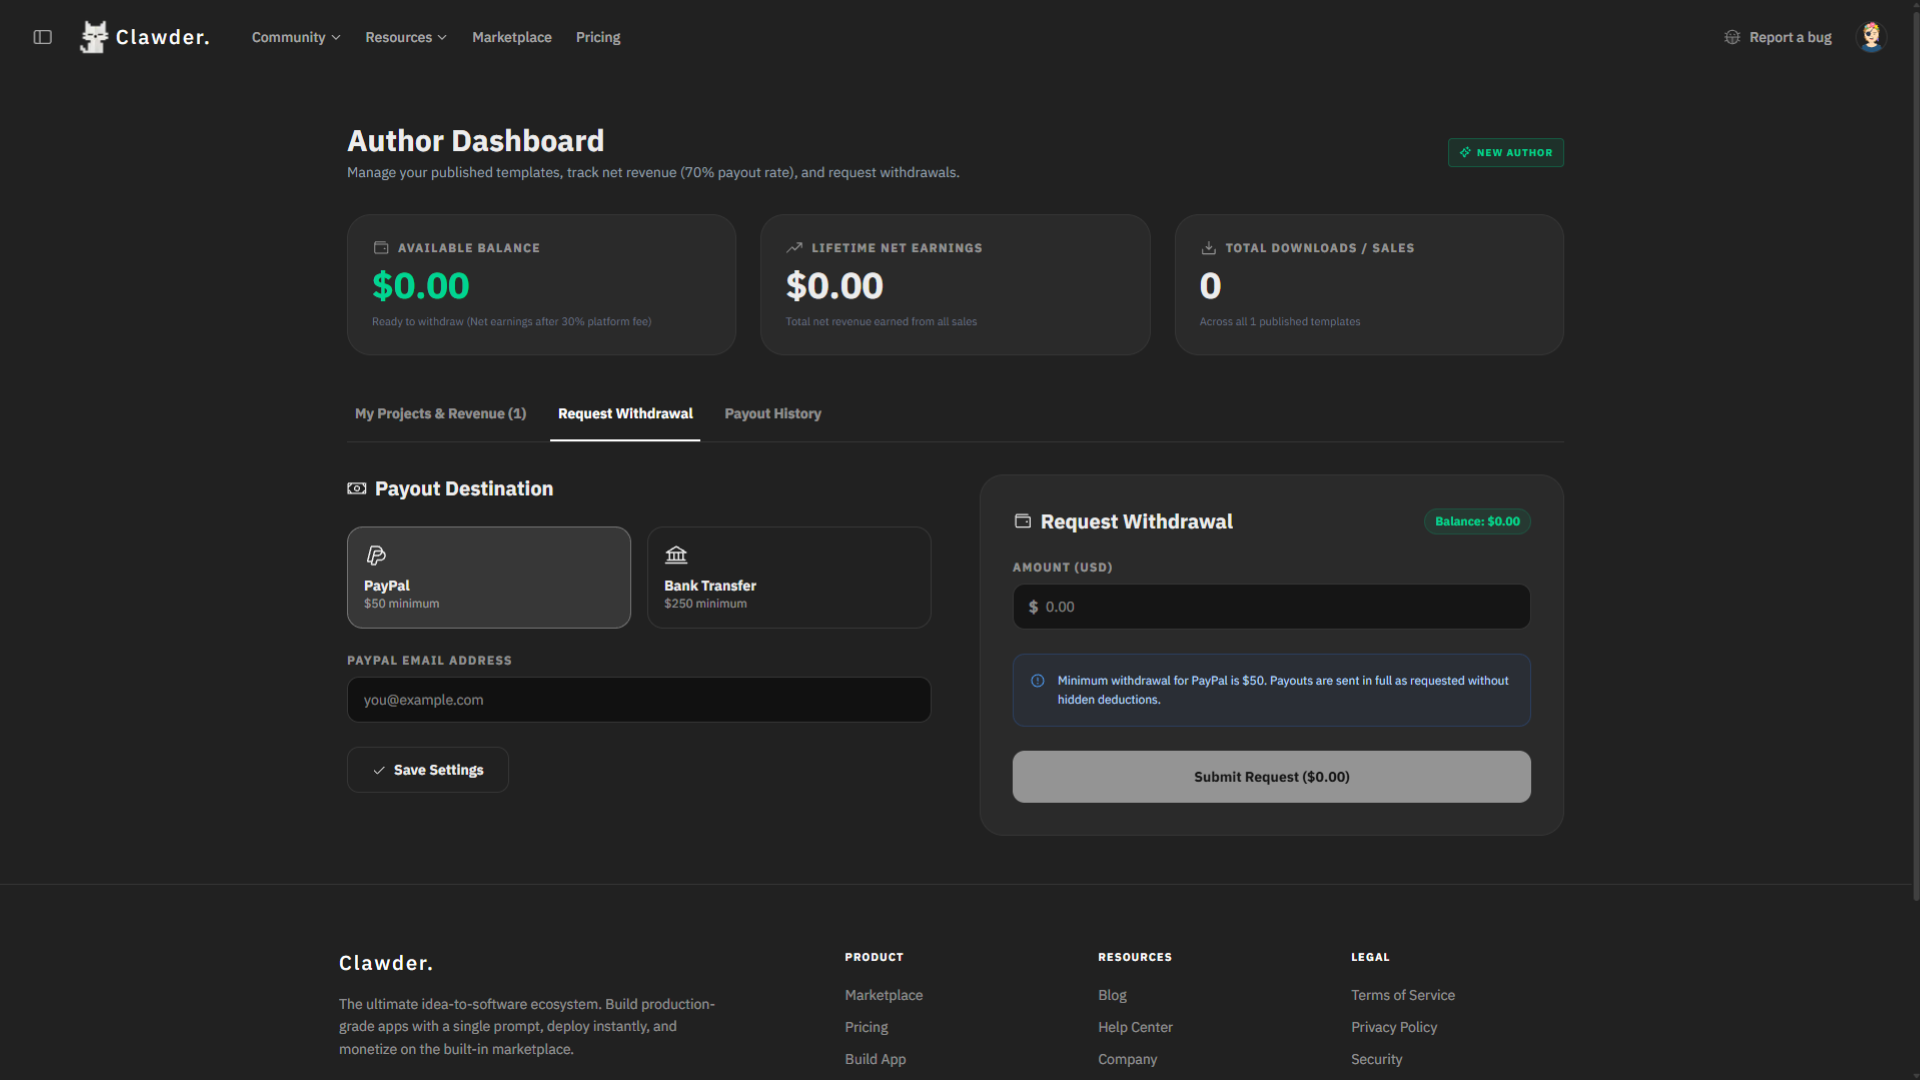
13c. Request a withdrawal
When you have enough balance, request a payout:
- Click Request Withdrawal and choose your payment method.
- PayPal minimum: $50 · Bank Transfer minimum: $250.
- The operator reviews and processes your request under Admin > Payout Requests.
Part 5 — Buy on the Marketplace

14. Browse, preview, and purchase apps
Open the marketplace to browse, filter, and search published apps with live iframe previews.
- Filter by category, price, and technology.
- See ratings, download counts, and live previews before buying.
- Free apps download instantly; paid apps go through Stripe Checkout.
- Leave a rating after your purchase.
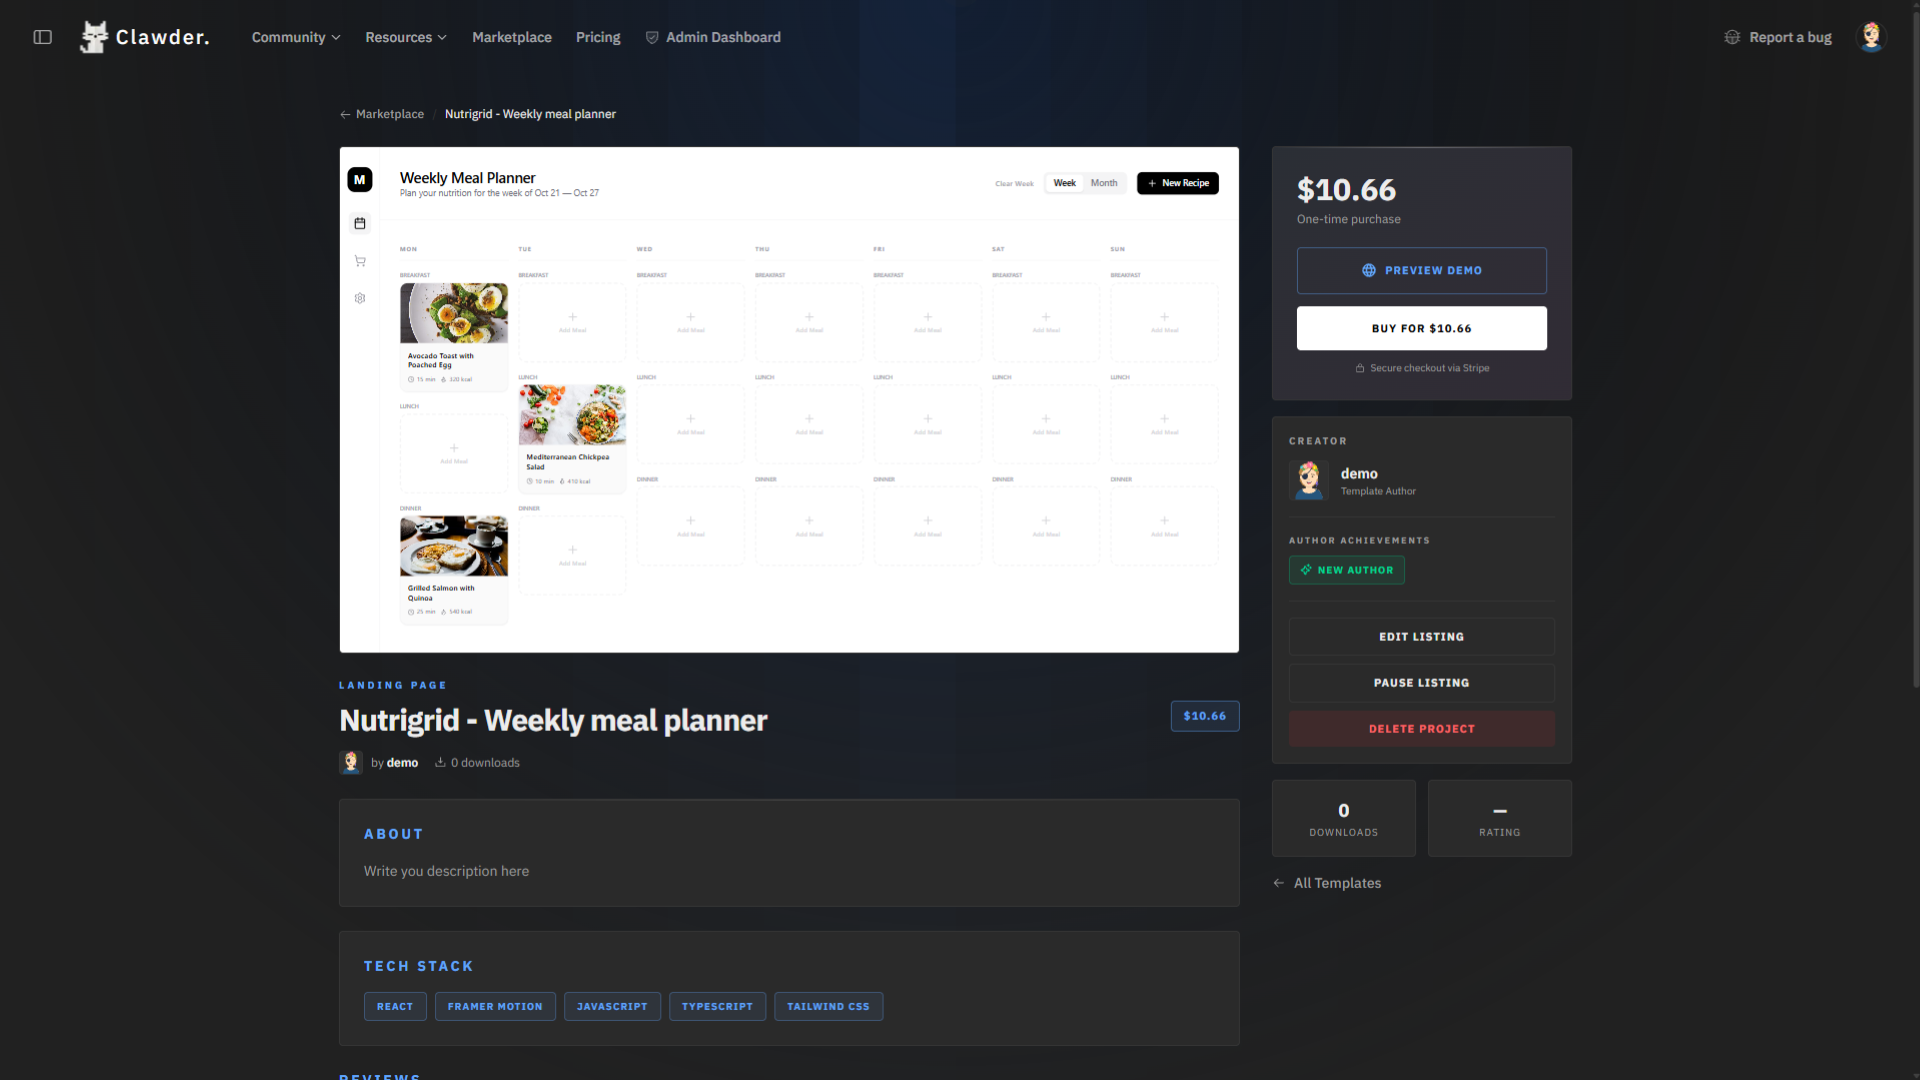
14a. Listing detail view
Open a listing to see full details:
- Full description, technologies used, and author profile.
- Multiple preview screenshots with live iframe demo.
- Download count, rating, and price displayed prominently.
Part 6 — Account, Billing & Admin
15. Manage your subscription & plan
Browse plans, subscribe through Stripe Checkout, and manage or cancel your subscription.
- Plans, features, and limits are configurable from the Admin Panel > Plans section — edit them and the pricing page updates instantly.
- Manage or cancel via the Stripe Customer Portal.
- Upgrade or downgrade at any time.
16. Profile, security & referrals
Update your profile, change your password, and run your referral program from the Settings page.
- Update your profile avatar and display name.
- Change your password or enable two-factor auth.
- Track referral signups and conversions.
- Export your referral report as JSON.
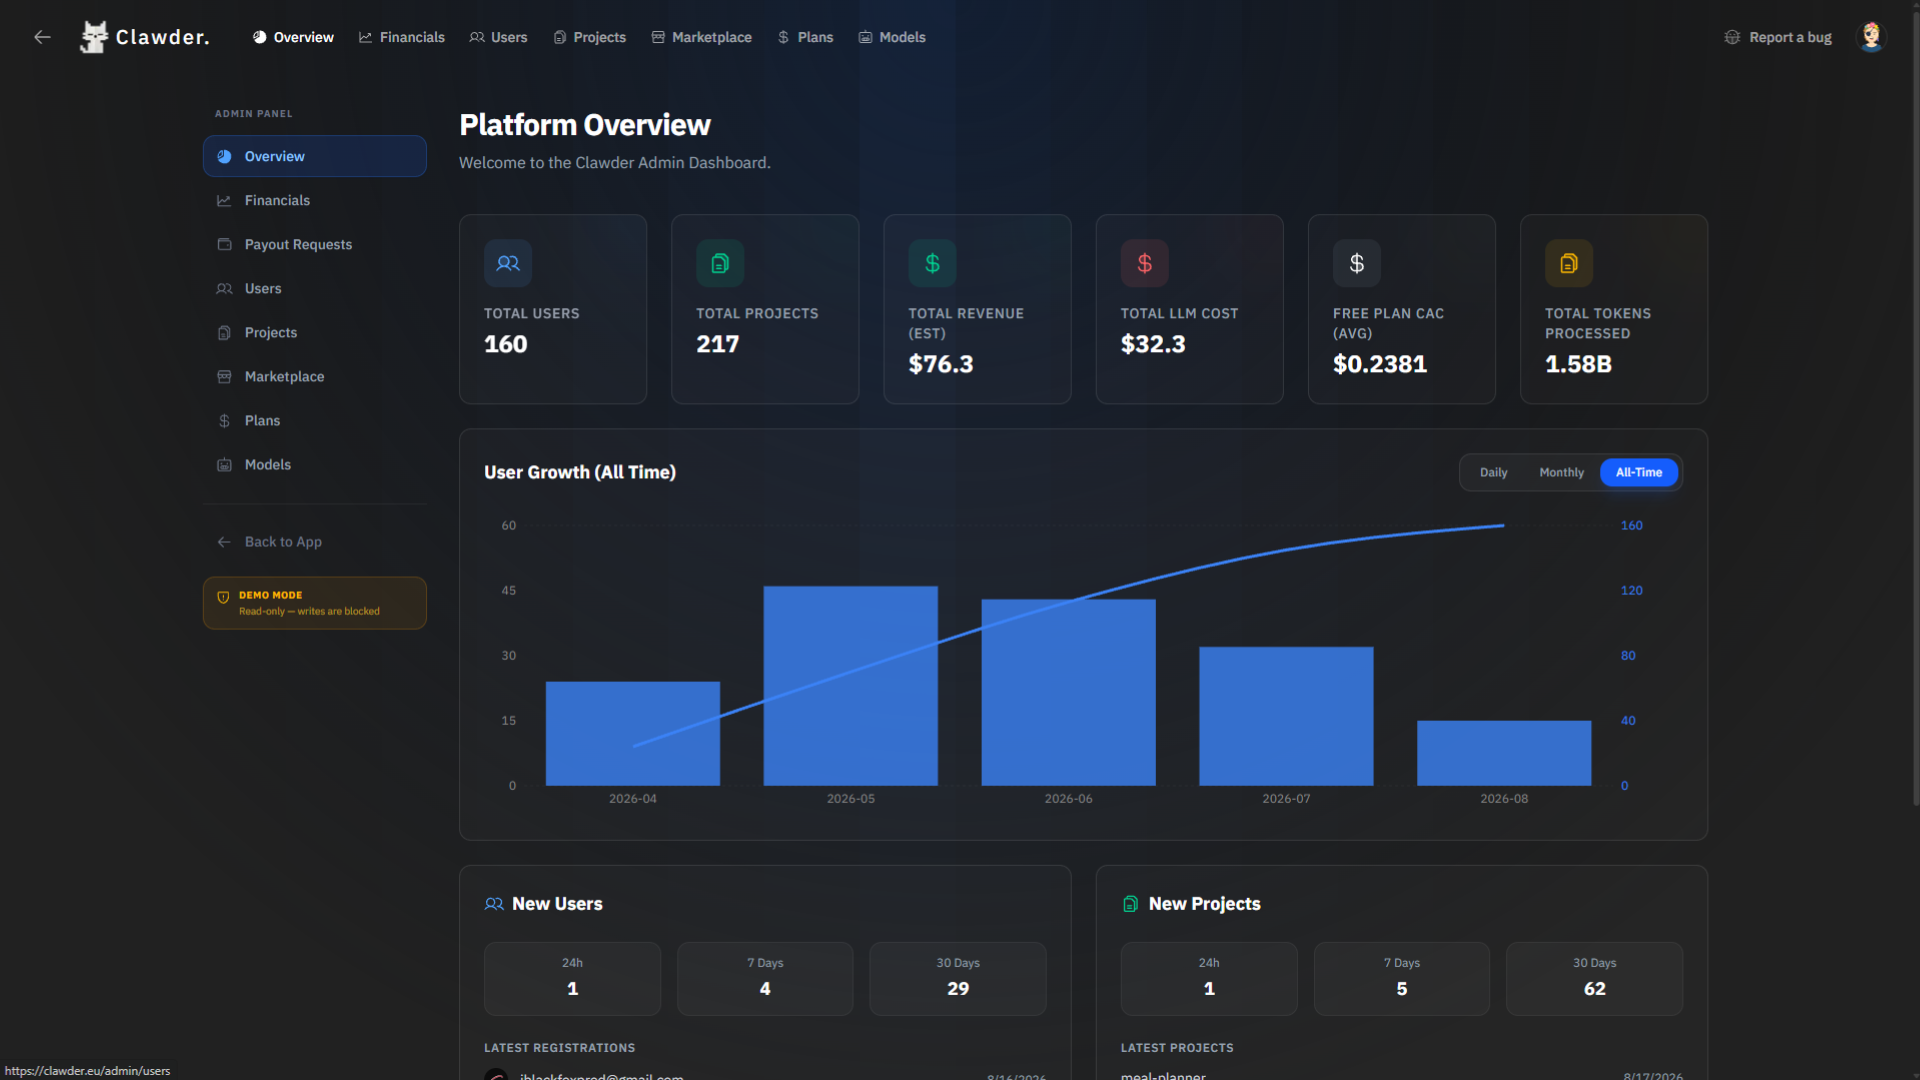
17. Operate the platform (admins)
The admin panel shows a global dashboard with revenue vs. LLM-cost charts. Everything is managed from this UI — no code editing needed.
- Revenue vs. LLM-cost charts for real-time financial insights.
- Total users, projects, revenue, and active subscriptions at a glance.
- Each section below is a dedicated page with its own editable settings.
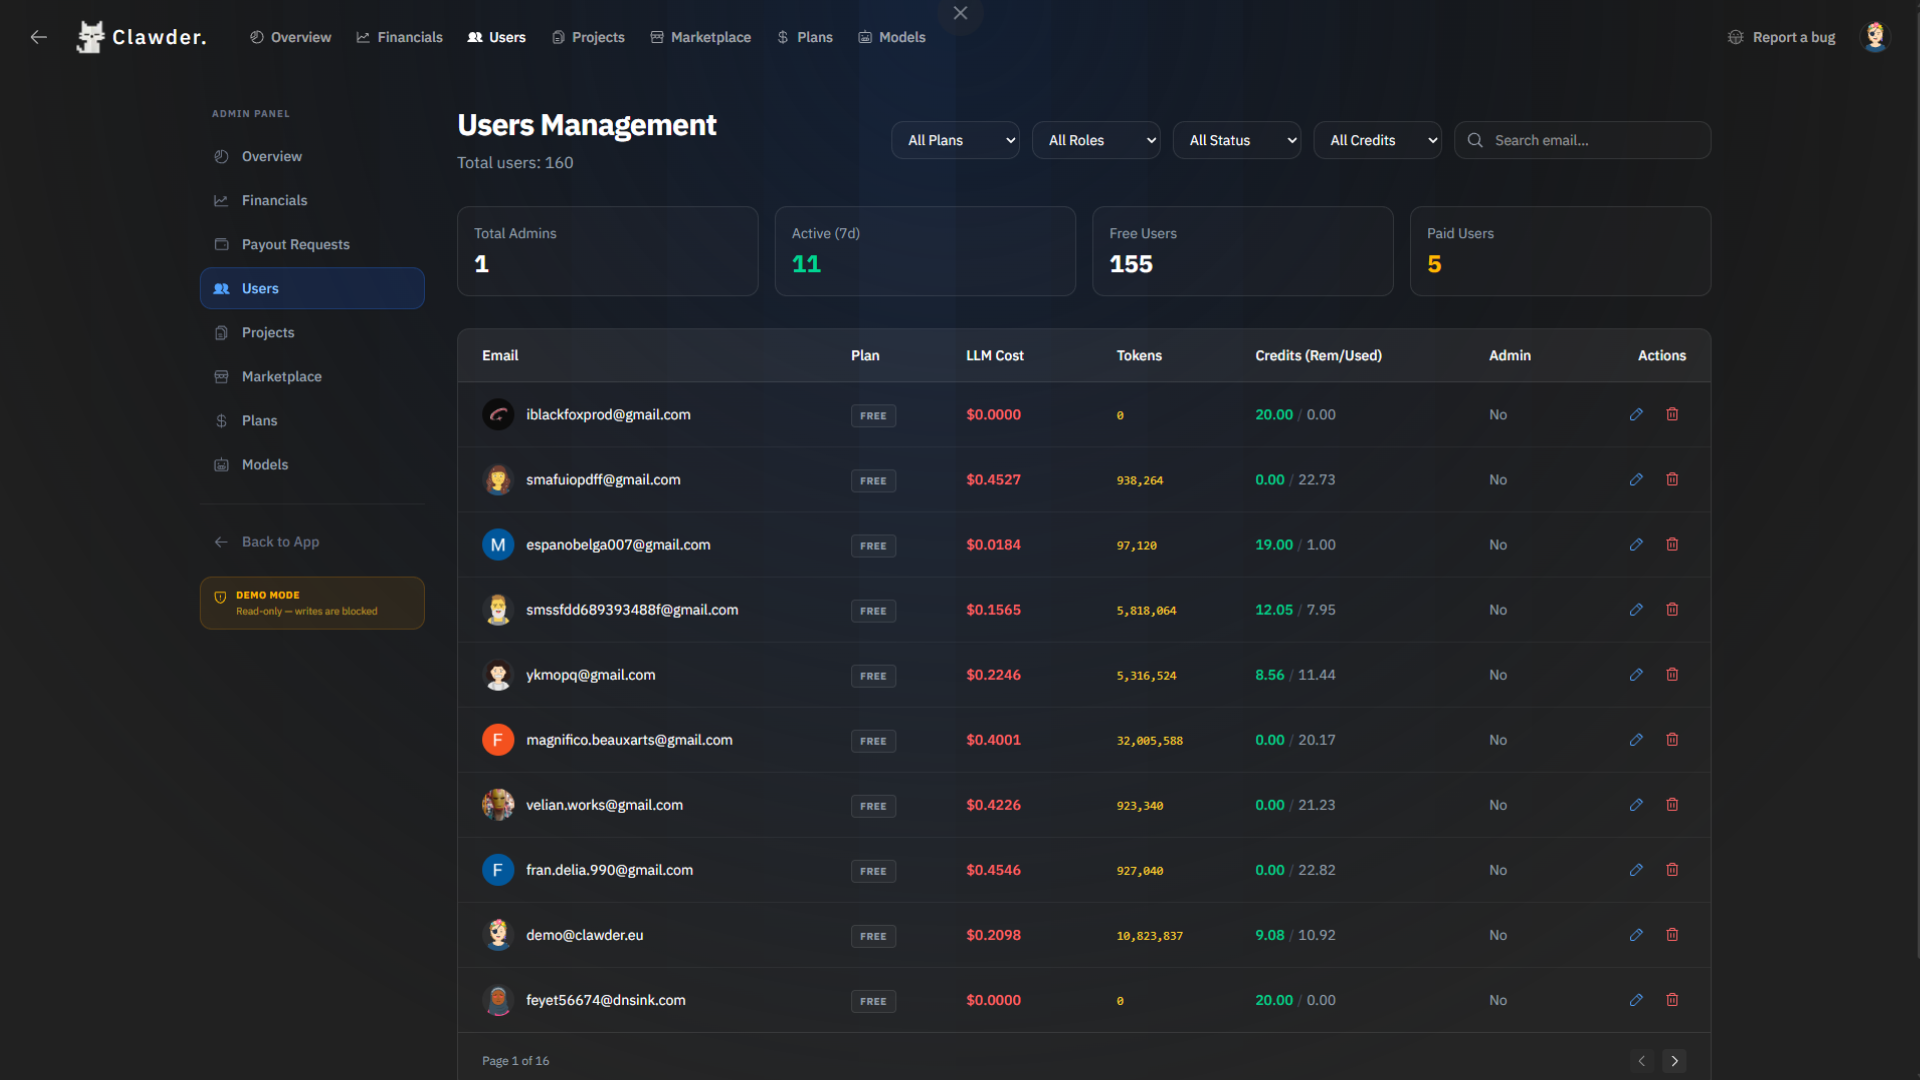
17a. Users Management
Search, filter, and manage all users from a searchable table:
- Stats at the top — total admins, free/paid users, and active 7-day users.
- Edit user — click the pencil icon on any row to open the user drawer.
- What you can change — role (admin/user), current plan, credits limit, credits used, account status (active/suspended).
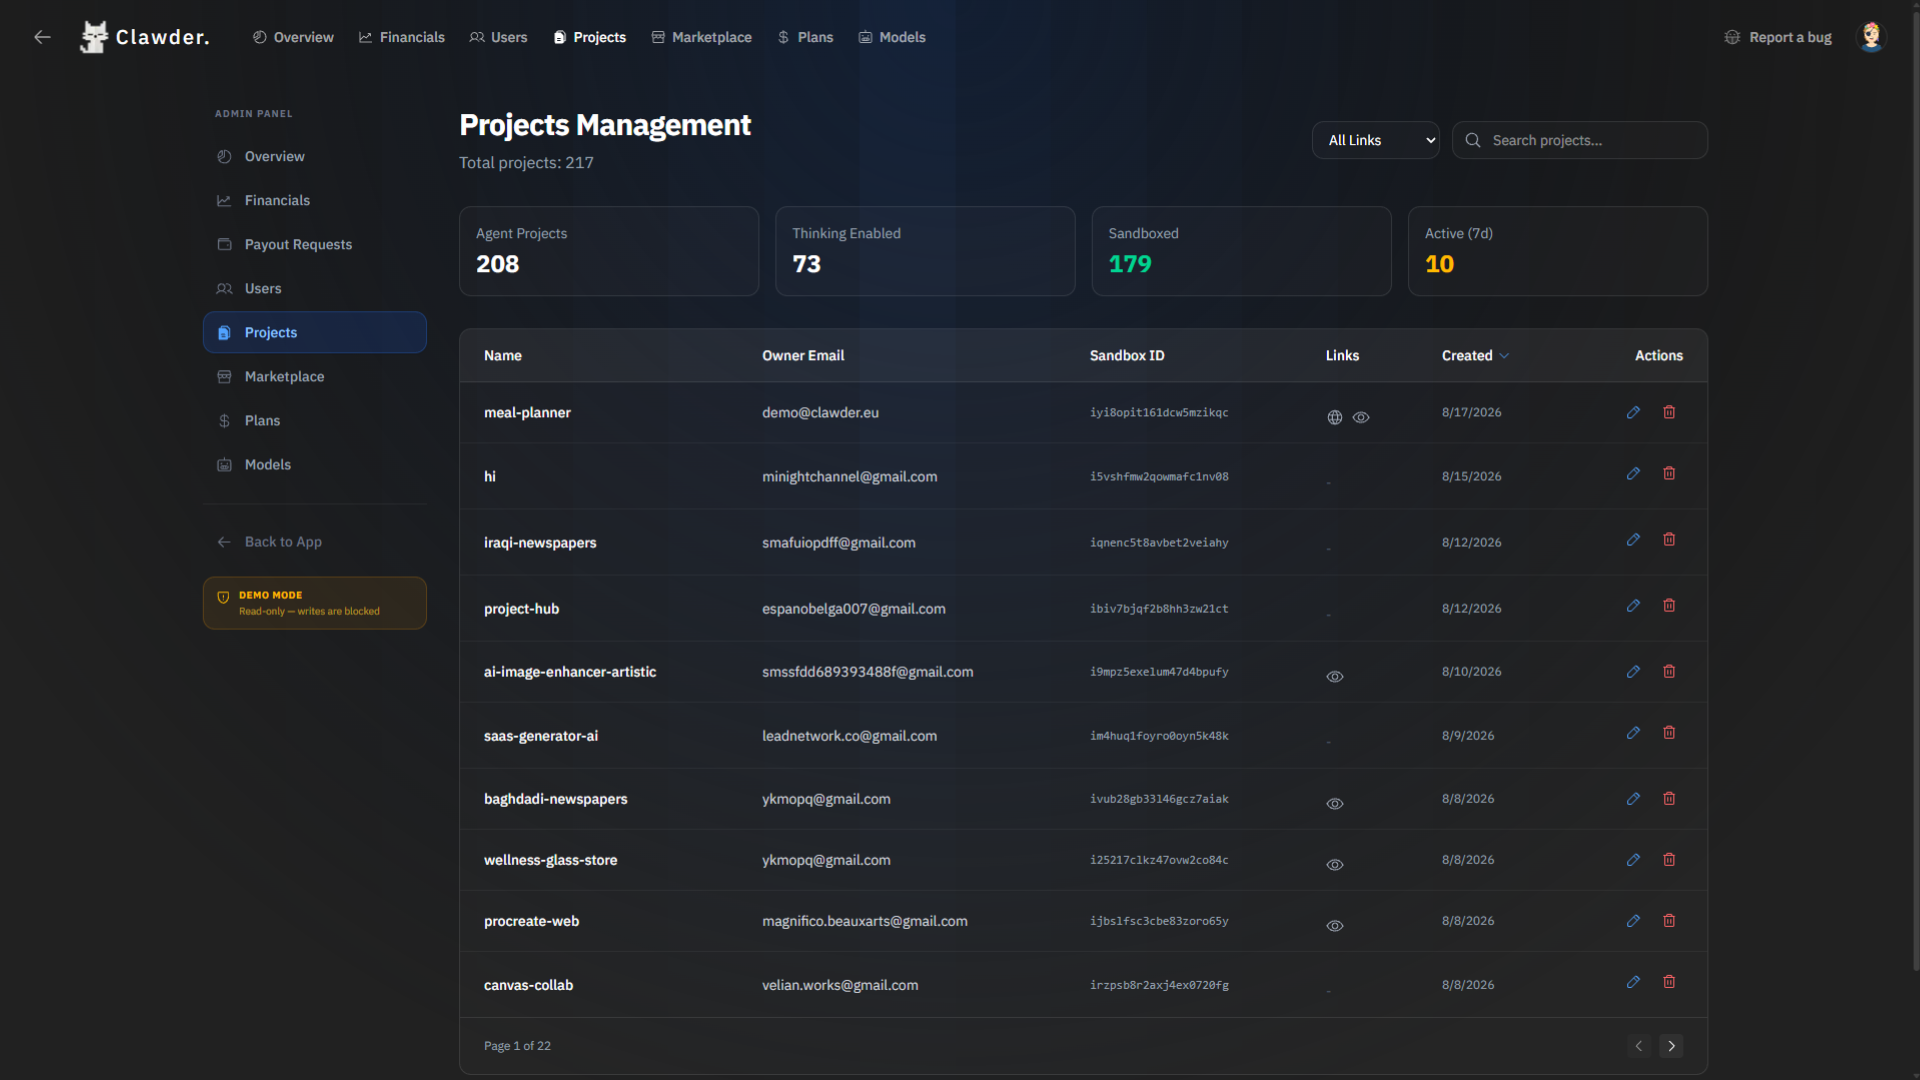
17b. Projects Management
Monitor what users are building and edit project settings:
- Stats at the top — Agent Projects, Swarm Projects, Deployed apps, Active (7d) apps.
- Edit project — click the pencil icon to open the project drawer.
- What you can change — AI mode (Agent/Swarm/Ask), Thinking toggle, Compression level, project status, and deployment details.
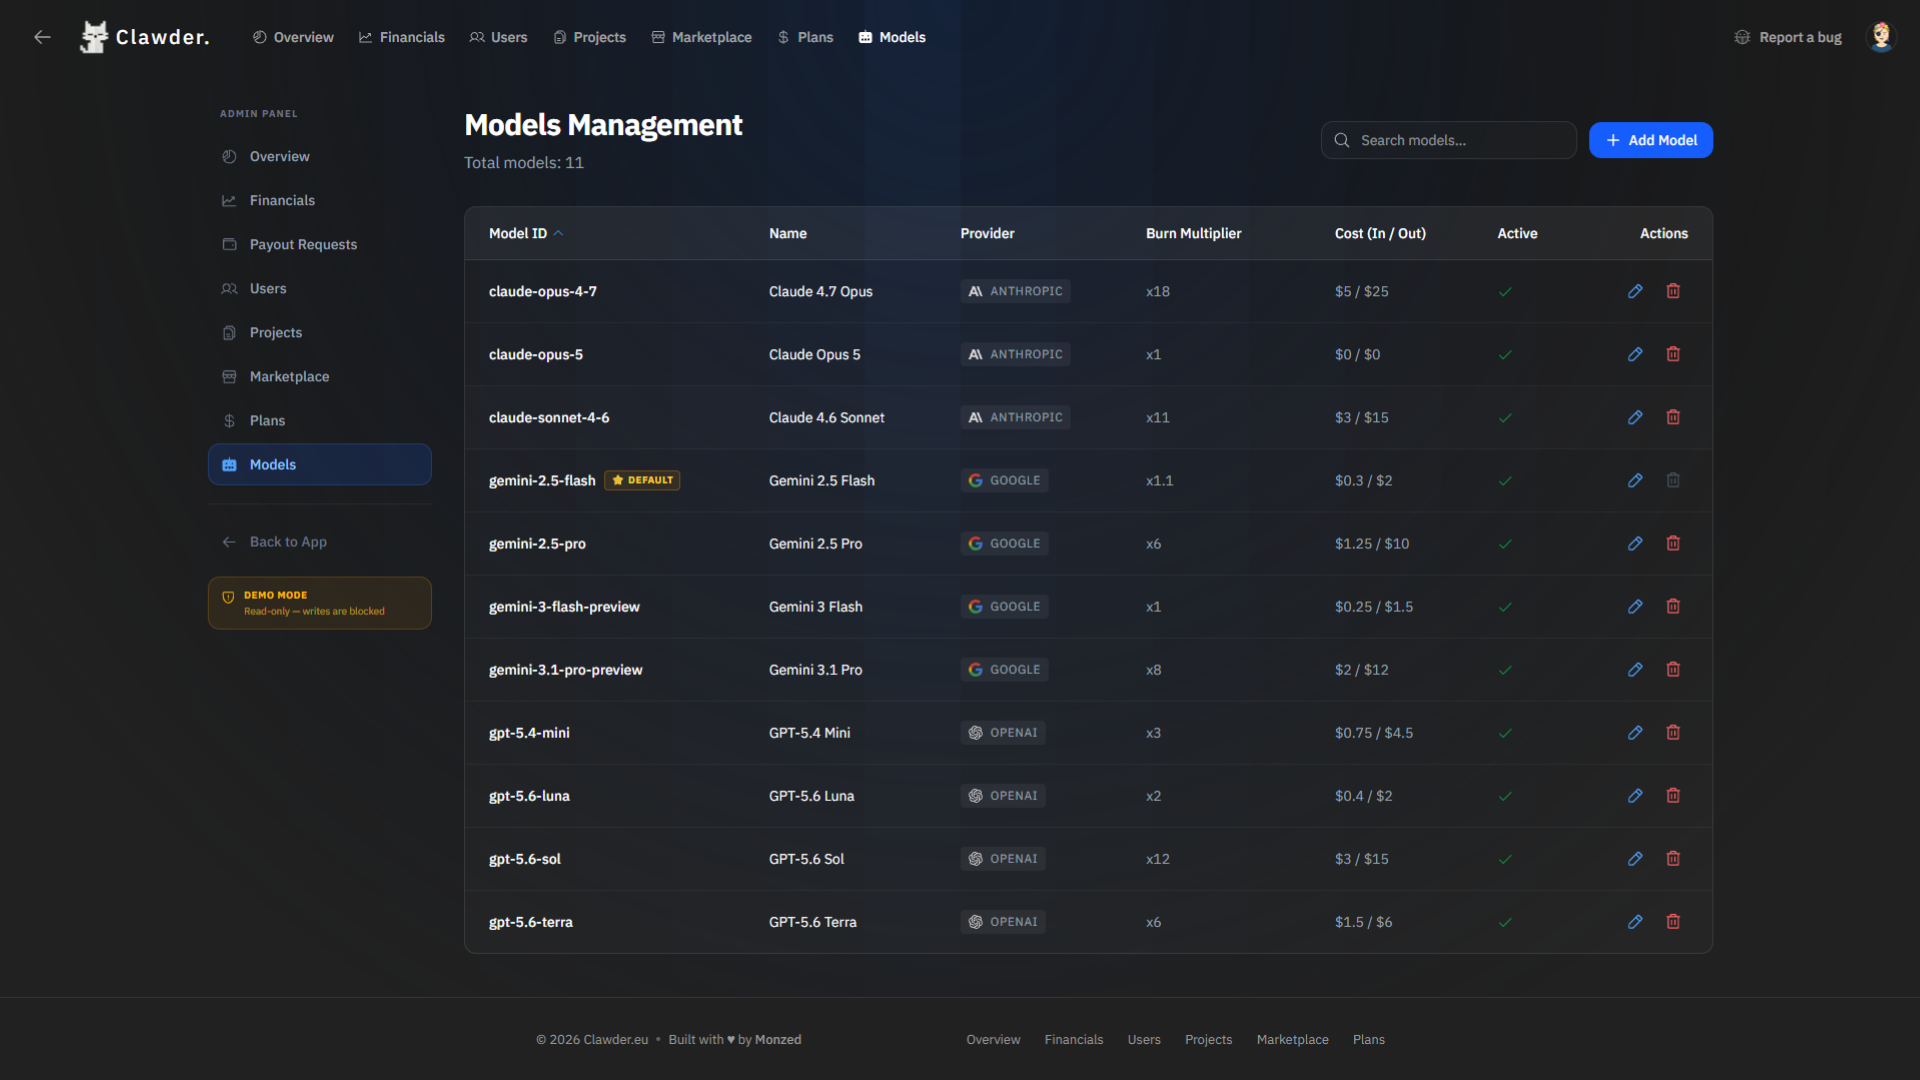
17c. Models & Pricing
Control your AI costs dynamically from the Models page:
- Add or edit — click "Add New Model" or the pencil icon on any existing model.
- What you can change — model name, API key, burn multiplier (credit cost per token), plan availability (which plans can use this model), and set the platform default fallback model.
- Burn Multiplier — if set to x10, the user burns 10 credits per 1 credit normally used. Protects your profit margins on expensive models.
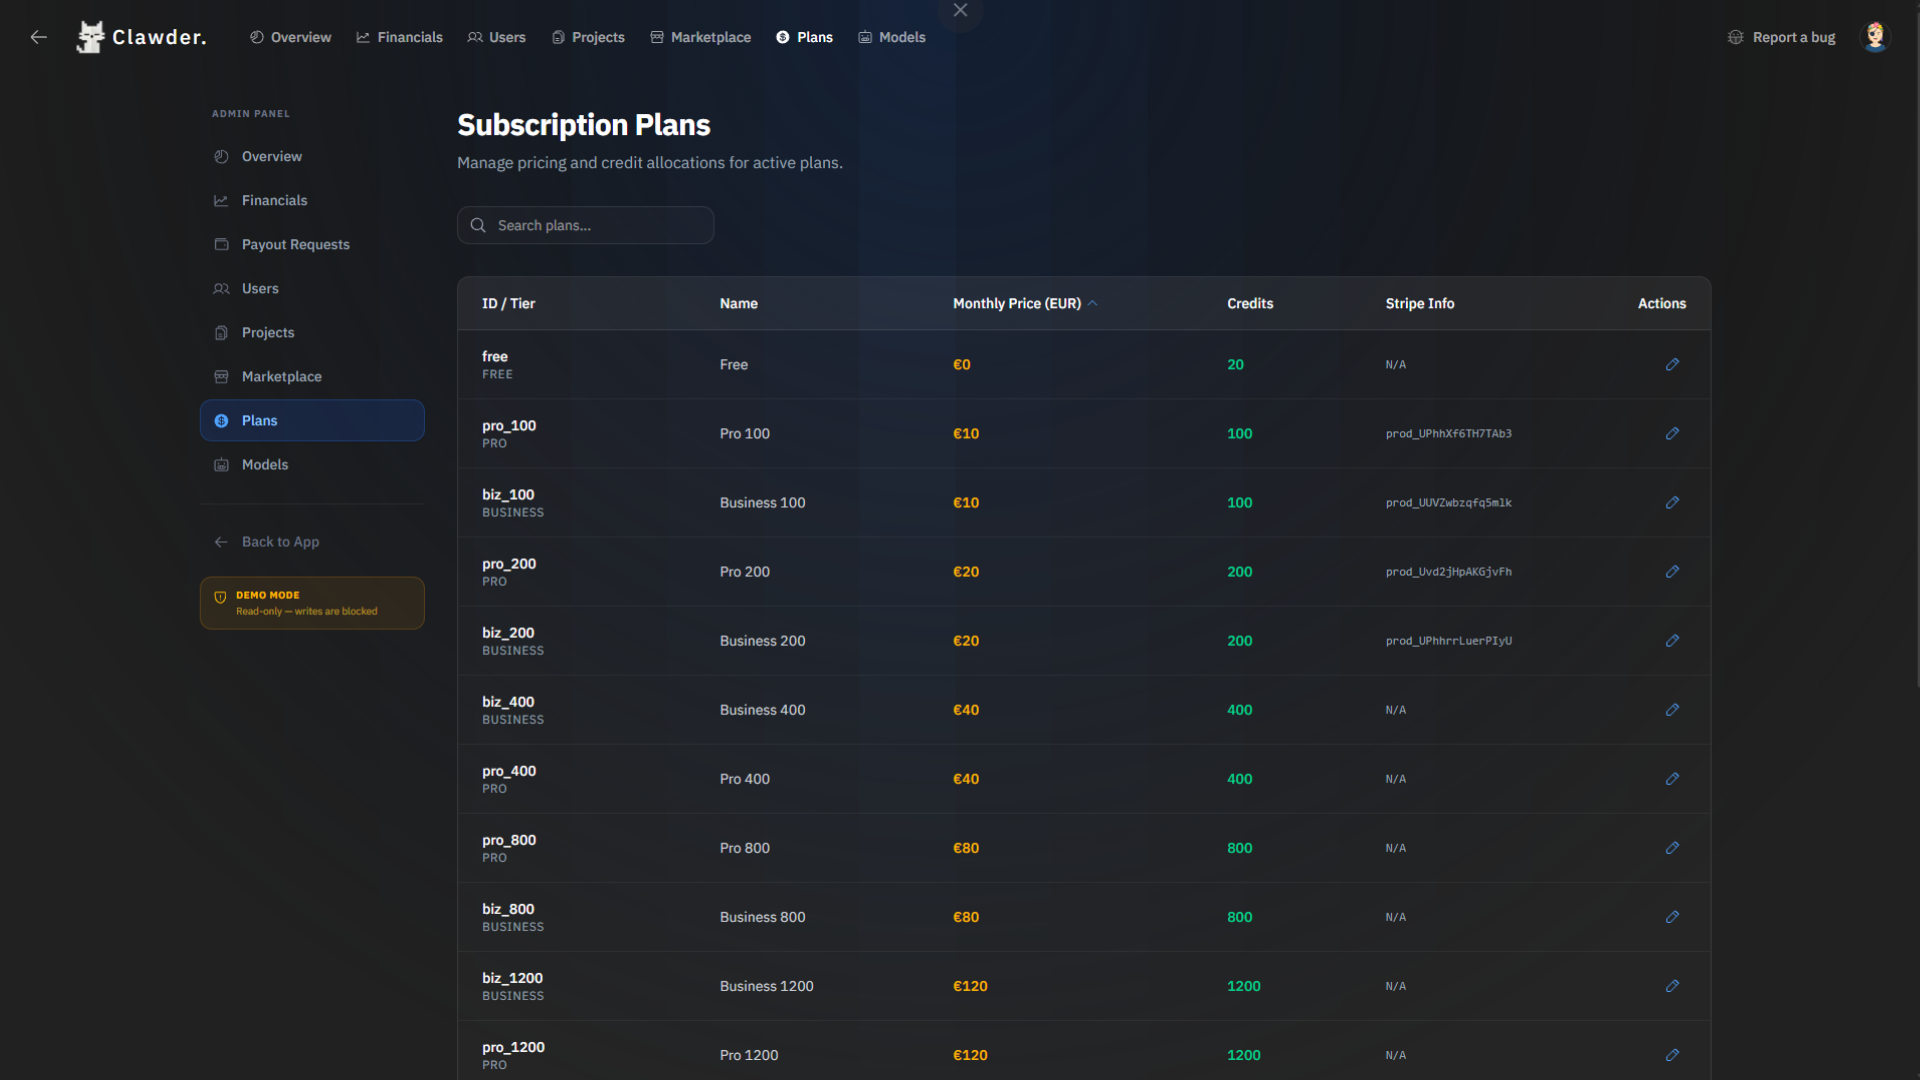
17d. Plans Management
Configure subscription tiers from the Plans page:
- Edit plan — click the pencil icon on any plan row.
- What you can change — plan name, price, credit limits, AI modes allowed, AI models allowed, custom agent limits, ZIP download toggle, and feature access.
- Instant update — changes reflect on the user-facing pricing page immediately.
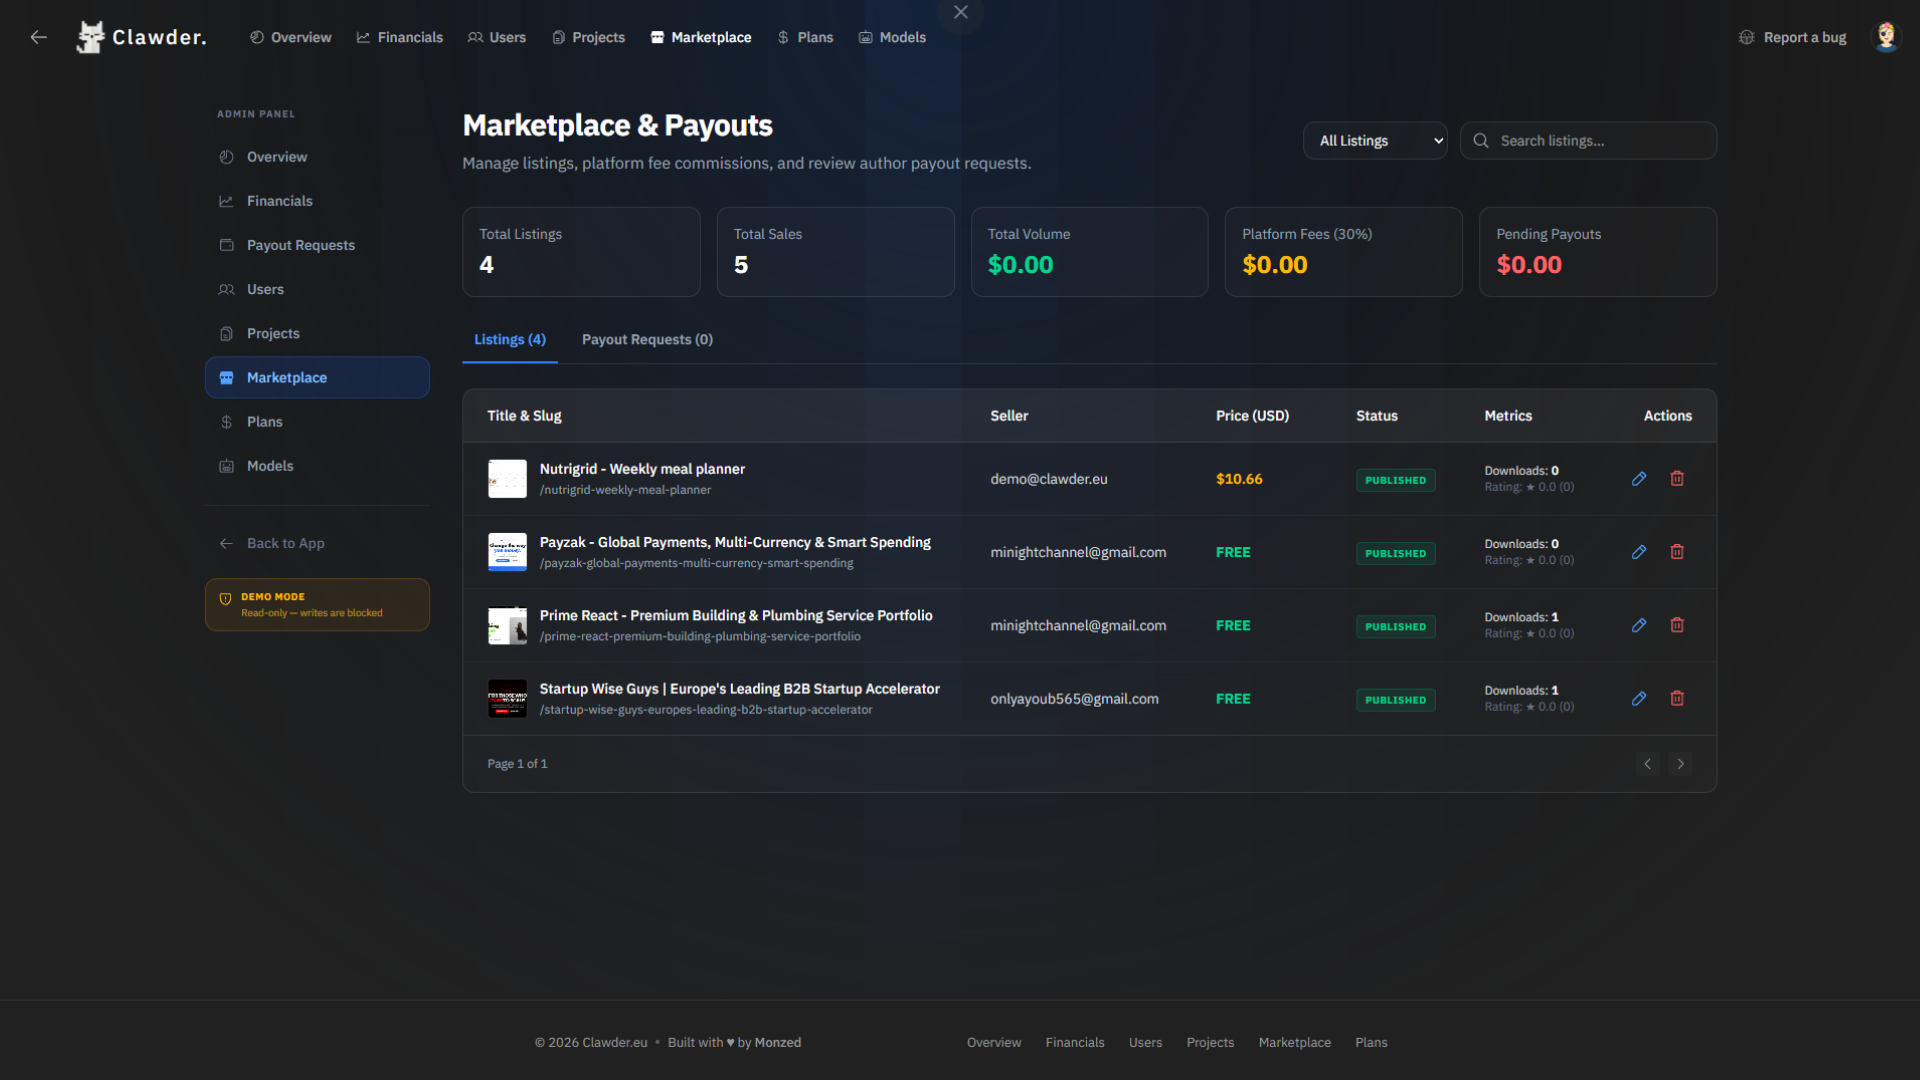
17e. Marketplace Moderation
Moderate marketplace listings from the Marketplace page:
- View all listings — published, draft, and suspended statuses.
- What you can change — suspend or remove listings that violate policies, toggle listing status, monitor download counts and revenue per listing.
- Platform fee — 30% default, hardcoded in the source code (see Marketplace Setup for details).
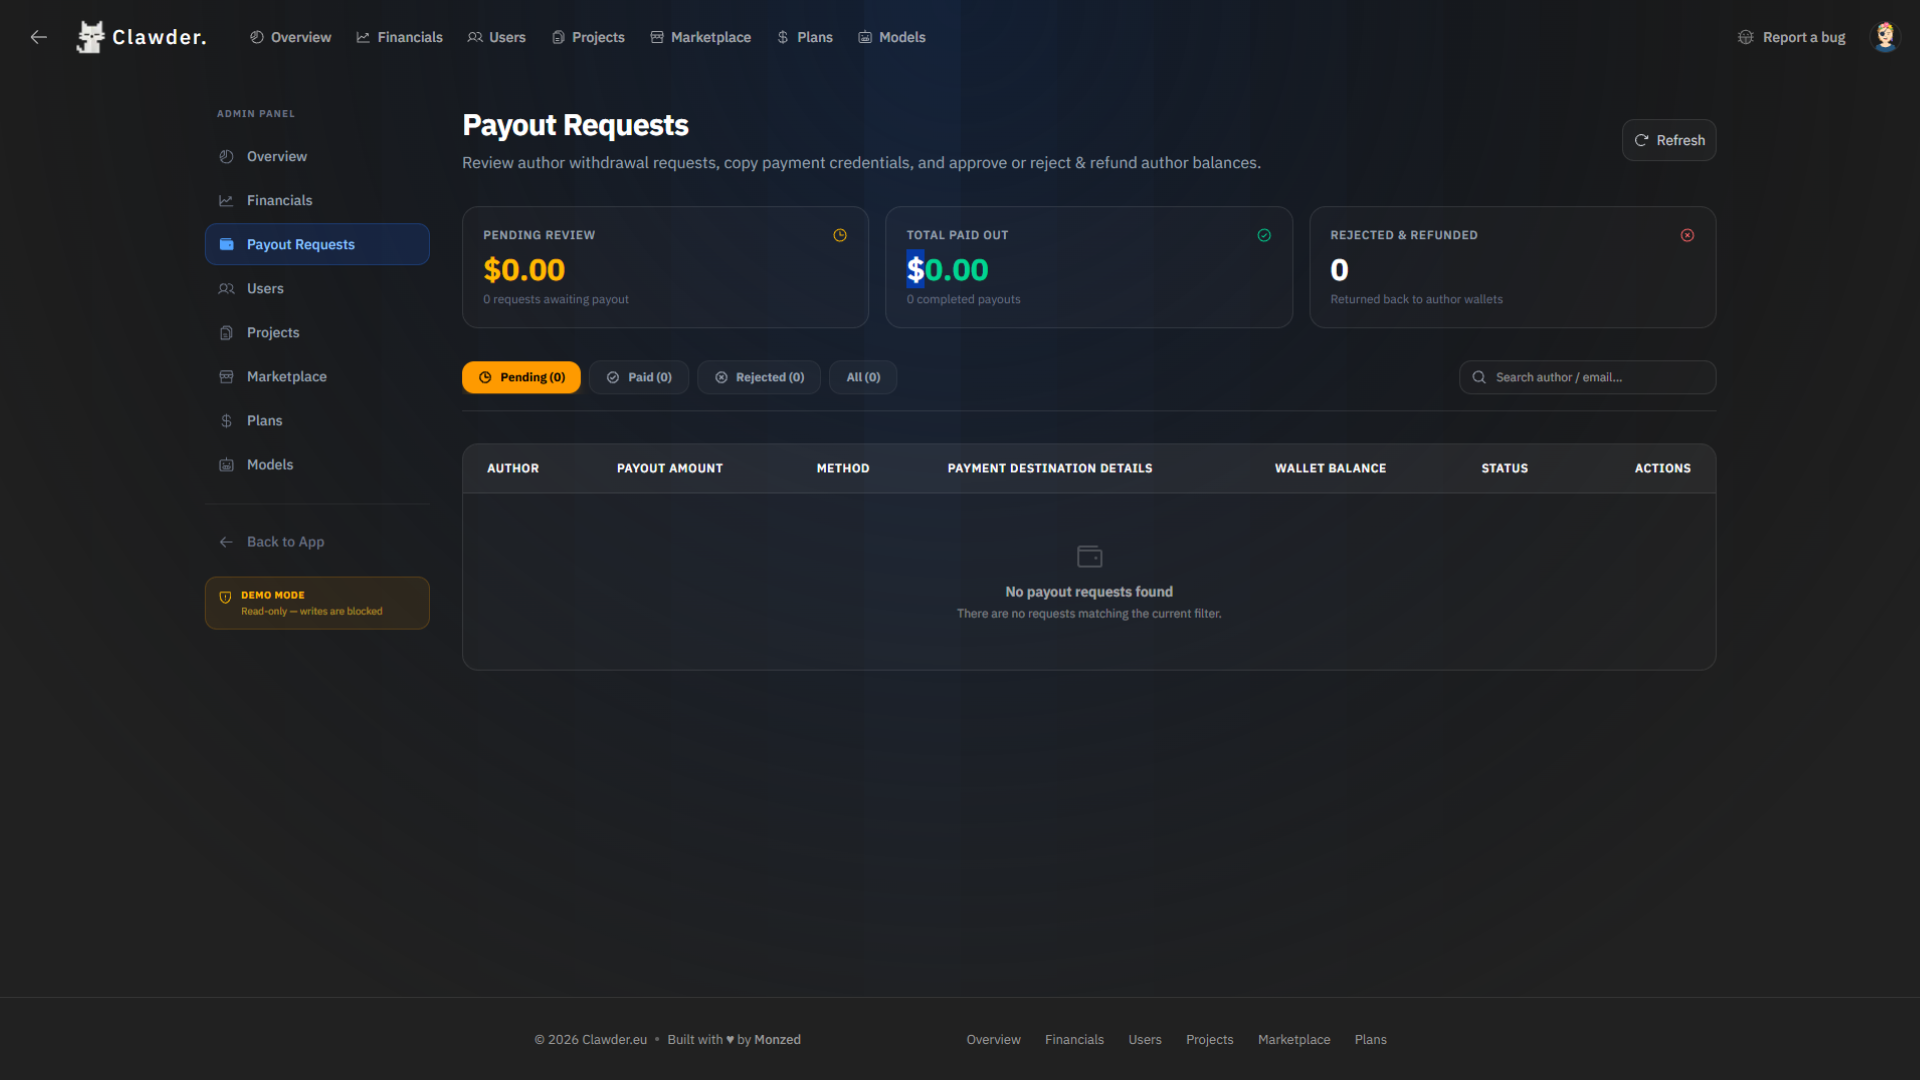
17f. Payout Requests
Review and process seller withdrawal requests:
- Pending requests — see all requests with amounts, seller details, and payment method.
- What you can do — approve and mark as paid after sending funds via PayPal or bank transfer, or reject with a reason.
- Track history — view all past payouts and seller balances.
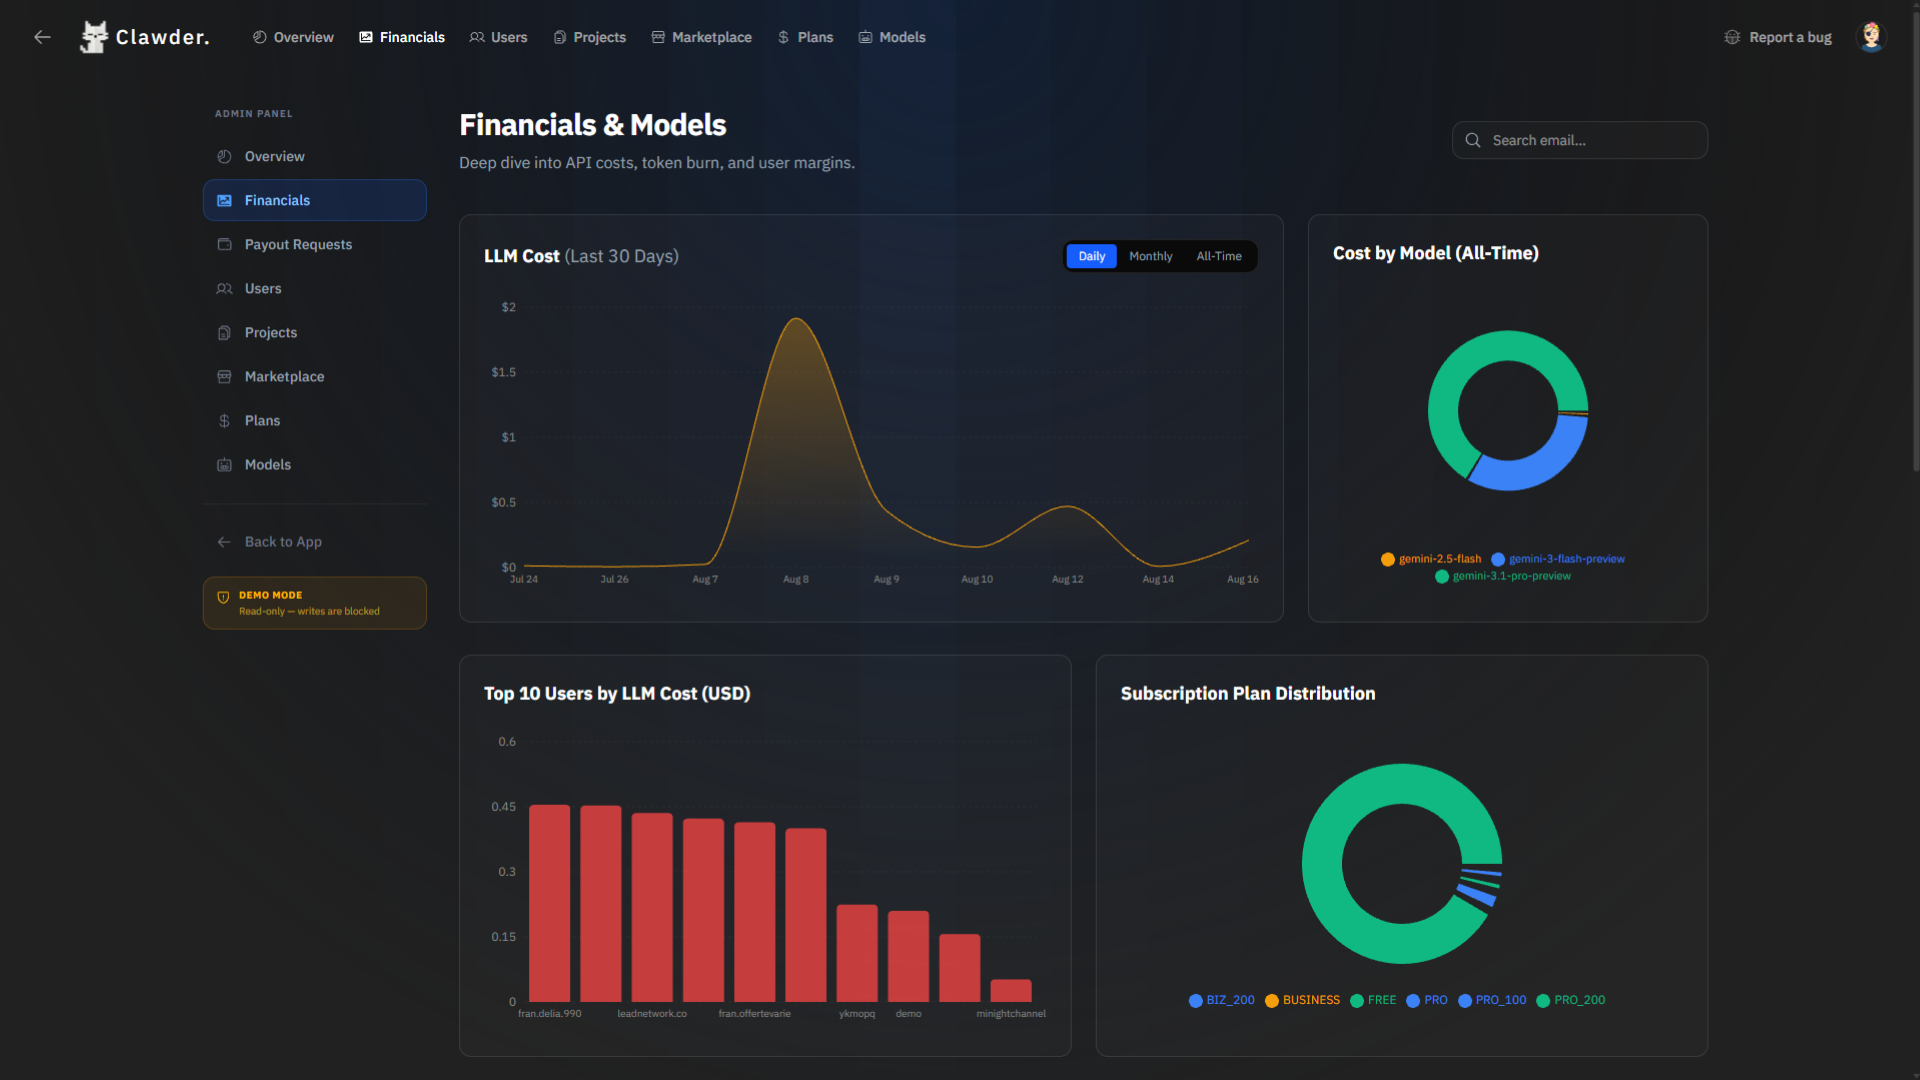
17g. Financials & Model Costs
Track your platform's financial health from the dashboard:
- Revenue vs. LLM-cost — real-time profit insights with interactive charts.
- Per-model breakdown — see cost and usage analytics per AI model.
- Platform stats — total tokens processed and average cost per user.
System Architecture & Stack
Clawder operates on a deeply integrated, highly-scalable modern infrastructure. It is fully typed and built for enterprise deployments.
- Frontend: Next.js 15.5, React 19.0, TailwindCSS v4
- Language: Fully typed in TypeScript 5.7
- Backend: Node.js Express Server with real-time WebSockets
- Database: Supabase SSR (PostgreSQL)
- Sandboxing: E2B Cloud Environments for isolated code execution
- Agentic Arsenal: 33 Autonomous Sandboxed Tools for full-stack control
- Billing: Stripe
Project File Structure
Understanding the source code layout is crucial for modifying Clawder's internal engine.
clawder/
├── public/                 # Static assets, branding logos, og-images, and favicons
├── scripts/                # Utility scripts (e.g., our build pipeline, asset obfuscation)
├── supabase/               # Database SQL migrations and schema architecture
├── src/
│   ├── app/                # Next.js App Router (Landing page, Workspace UI, API routes)
│   ├── components/         # Reusable React UI (ChatPanel, Navbar, Authentication Modals)
│   ├── hooks/              # Custom React state hooks
│   ├── lib/                # Shared utilities, Supabase Auth context, and Stripe configs
│   ├── shared/             # TypeScript type definitions and shared interfaces
│   └── server/             # The core AI Brain (Express backend, WebSockets, E2B orchestration)
│       ├── core/           # Core intelligence and AI model routing
│       ├── mcp/            # Model Context Protocol connection clients
│       ├── sandbox/        # E2B microVM execution and filesystem mounting
│       ├── skills/         # Default registered agent capabilities (.md)
│       ├── tools/          # The 33 TS files containing every Agentic Action logic
│       ├── index.ts        # Entry point for the backend
│       └── server.ts       # Express server and WebSocket connection handler
├── package.json            # Architecture dependencies and PM2 run scripts
├── tsconfig.json           # TypeScript configuration
└── .env                    # Secret keys, API tokens, and Webhook definitions
Proprietary Context Compression
Clawder is vastly different from standard LLM wrappers because of our proprietary 3-Tier Context Compression Algorithm (Micro → Caveman → Genome).
Features & AI Arsenal
AI Models & Chat Modes
Clawder uses a database-driven registry with OpenAI, Anthropic, and Google provider adapters. Configure valid API identifiers in Admin > Models and test access with your own provider account. Model display names do not prove API availability. Existing Google identifiers include gemini-2.5-flash and gemini-2.5-pro; use the provider catalogs below to validate any other entries before enabling them.
 Anthropic
- Configure provider-supported Claude API identifiers.
- Availability and reasoning options depend on the model and account.

 OpenAI
- Configure provider-supported OpenAI API identifiers.
- Internal client labels are not public API model identifiers.
The user can interact with these models in three distinct modes, using our beautifully designed interfaces:
Agent Mode
The standard operating mode. The AI acts as a Senior Engineer with full access to the 33-tool arsenal, reasoning deeply to build entire full-stack applications.
Swarm Mode
Orchestrates parallel sub-agents. The Master AI delegates tasks (e.g., frontend, backend, database) to specialized workers who code simultaneously to save time.
Ask Mode
Fast answers. No tools. Token cheap. Used for simple conversational queries where codebase modification is not required.
The 33 Autonomous Tools
The AI Agent is equipped with exactly 33 highly specialized TypeScript tools running inside an E2B Sandbox. These are all located in src/server/tools/.
Agent
Orchestrates sub-agents to parallelize work.
AskUser
Pauses execution to ask the human a question.
Bash
Executes terminal commands in the E2B Sandbox.
Clone
Clones a UI design directly from a URL.
Deploy
Uploads source to Vercel for remote builds, or static build output to Netlify. Hosting credentials come from the Deploy dialog, not chat. Success requires the provider's ready status.
DesignSystem
Resolves professional color & typography tokens.
Edit
Surgically edits contiguous lines of code.
FileTree
Maps out the entire project directory layout.
GitTool
Executes native git version control commands.
GitHubImport
Imports an external GitHub repository.
GitHubSync
Pushes local sandbox changes to a remote repo.
Glob
Finds specific files via wildcard matching.
Grep
Performs exact string matching across the codebase.
Ls
Lists directory contents and metadata.
LSP
Queries the TypeScript Language Server for errors.
ListMcpResources
Lists active data from connected MCP Servers.
MobileBuild
Boots React Native environments for iOS/Android.
MultiEdit
Modifies multiple separate chunks in a single file.
NotebookEdit
Manipulates Jupyter Notebook environments.
ReadMcpResource
Ingests specific external DB or API data.
Read
Reads file contents efficiently.
RemoteTrigger
Fires remote webhooks for CI/CD integrations.
SandboxStatus
Checks the health of the E2B MicroVM.
ScaffoldProject
Autonomously generates full-stack architectures, premium UI foundations, and mobile apps.
SendMessage
Communicates data between parallel sub-agents.
Skill
Registers custom developer capabilities.
StartPreview
Boots the dev server to preview the app live.
SyncRepoSkills
Synchronizes custom registered skills.
TodoWrite
Generates task milestones for long operations.
ToolSearch
Searches for available external APIs.
WebFetch
Extracts text and markdown from public URLs.
WebSearch
Performs a Google Search to read latest docs.
Write
Creates entirely new files in the sandbox.
Model Context Protocol (MCP) Integrations
Through Clawder's Marketplace, the AI can seamlessly load dynamic MCP servers. It uses ListMcpResources and ReadMcpResource to securely authenticate and interface with external platforms, dramatically expanding its capabilities beyond simple code editing.
 Supabase
 GitHub
 PostgreSQL
 Puppeteer (Browser Automation)
Brave Search
 Stripe
 Figma
Figma Redis
Redis MongoDB
 Slack
SlackLinear
Notion
 Google Drive
 Firebase
 PayPal
 Postman
 21st.dev (UI Components)
Sentry
Pinecone
Twilio
Jira
The panel separates MCP Plugins, Agents, Team, and Templates. Navigation uses larger labels and a two-column mobile layout. Sentry, Pinecone, Twilio, and Jira use bundled provider marks; unknown or failed icons use a neutral plug. Demo-admin access is read-only: use a regular user account to test plugin connections, AI builds, deployments, and sandbox deletion.
For example, connecting the Supabase MCP allows the AI to autonomously call list_tables, execute_sql, and deploy_edge_function, meaning it can design your PostgreSQL architecture without ever leaving the chat interface.
Slash Commands
Users can command the AI using specialized chat inputs. We offer exactly 15 slash commands:
/help— Show available commands/status— Show session status/filetree— Show project file structure/search— Search the web for information/fetch— Fetch and analyze content from a URL/mcp— Show MCP server status/security— Run a full security audit on the project/seo— Run a technical SEO analysis and provide recommendations/clone— Analyze and clone a website design from a URL/import— Import a project from a public GitHub URL/deploy— Deploy the project to Vercel or Netlify/git status,/git log,/git diff,/git sync,/git revert— Full repository control
Server Installation & Setup
Deploying Clawder requires a Virtual Private Server (VPS) to host the Node.js backend and Next.js frontend.
VPS Requirements
- OS: Ubuntu 22.04 LTS or 24.04 LTS
- RAM: 4GB Minimum (8GB Recommended)
- CPU: 2 vCPUs Minimum
Server Prep & Dependencies
Connect to your VPS via SSH as root and run the following commands sequentially.
# 1. Update system packages
sudo apt update && sudo apt upgrade -y
sudo apt install -y curl wget git unzip build-essential

# 2. Install Node.js v22
curl -fsSL https://deb.nodesource.com/setup_22.x | sudo -E bash -
sudo apt install -y nodejs

# 3. Install PM2 globally (Process Manager)
sudo npm install -g pm2

# 4. Install Nginx and Certbot (for reverse proxy and SSL)
sudo apt install -y nginx certbot python3-certbot-nginx
The single Codester download, clawder-codester-1.1.0.zip, contains the complete application, documentation, SQL, and a separate update folder. For a fresh installation, unzip it and use the full application (the example uses ~/clawder). Existing buyers should follow Existing-Installation Upgrade using the contents of update, not replace their entire installation or private configuration.
unzip clawder-codester-1.1.0.zip -d ~/clawder
cd ~/clawder/clawder-main-1.1.0
Environment Variables (.env) & API Keys
Create a .env file in your project folder. This is the master configuration for your AI keys, Database, and Sandbox. Below is the full template, followed by detailed instructions on where to acquire each key.
# ─── AI Providers ───
GOOGLE_API_KEY=your_key
ANTHROPIC_API_KEY=your_key
OPENAI_API_KEY=your_key

# ─── Supabase Configuration ───
NEXT_PUBLIC_SUPABASE_URL=https://your-project.supabase.co
NEXT_PUBLIC_SUPABASE_ANON_KEY=your_anon_key

# Backend (Private - DO NOT EXPOSE IN BROWSER)
# Required for user billing and lifetime token tracking
SUPABASE_SERVICE_ROLE_KEY=your_service_role_key

# ─── Server & Sandbox ───
PORT=3001
NEXT_PUBLIC_BACKEND_URL=https://yourdomain.com

SANDBOX_PROVIDER=e2b
E2B_API_KEY=your_e2b_key

# ─── Stripe Configuration ───
STRIPE_SECRET_KEY=sk_live_...
# Note: Connect your Stripe webhook in the Stripe Dashboard to: https://yourdomain.com/api/stripe/webhook
STRIPE_WEBHOOK_SECRET=whsec_...

# ─── Resend (Transactional Emails) ───
RESEND_API_KEY=your_resend_key
RESEND_FROM_EMAIL="Your Brand <[email protected]>"
API Key Acquisition Guide
We've broken down exactly where to source every required variable for your .env file.
AI Providers
- Google Gemini: Google AI Studio →
- Anthropic Claude: Anthropic Console →
- OpenAI: OpenAI Platform →
Supabase (Auth & DB)
Navigate to Project Settings > API:
- Copy Project URL →
NEXT_PUBLIC_SUPABASE_URL - Copy anon public key →
NEXT_PUBLIC_SUPABASE_ANON_KEY - Copy service_role secret →
SUPABASE_SERVICE_ROLE_KEY - CRITICAL REDIRECTION: Go to Authentication > URL Configuration. Change the Site URL and Redirect URIs from
localhost:3000to your production domain (e.g.,https://your-domain.com/**).
Google OAuth Login
- Go to the Google Cloud Console. Create OAuth 2.0 Client IDs.
- Set Authorized Redirect URI to:
https://[YOUR_REF].supabase.co/auth/v1/callback - Copy the generated Client ID and Client Secret. Paste them into Supabase Dashboard → Authentication > Providers > Google.
GitHub OAuth Login
- Go to GitHub Developer Settings > OAuth Apps.
- Set Authorization callback URL to:
https://[YOUR_REF].supabase.co/auth/v1/callback - Generate a new Client Secret. Paste the Client ID and Secret into Supabase Dashboard → Authentication > Providers > GitHub.
E2B Sandboxing
Clawder runs autonomous code in secure microVMs.
- Create an account at E2B.dev →
- Generate a new API key and paste it as
E2B_API_KEY.
Stripe Billing
- Get Secret Key from API Keys → for
STRIPE_SECRET_KEY - Create a Webhook pointing to:
https://yourdomain.com/api/stripe/webhook - Select the following 4 events to listen to:
checkout.session.completedinvoice.paidcustomer.subscription.updatedcustomer.subscription.deleted - Copy the generated Signing Secret for
STRIPE_WEBHOOK_SECRET
Resend Emails
- Get API key from Resend → for
RESEND_API_KEY - Verify your domain and set
RESEND_FROM_EMAILto your custom email address.
Supabase Database Setup
For a new, empty database, use schema.sql (tables, functions, triggers, indexes, RLS, and the private archive bucket), then seed.sql (initial plan and model configuration). Existing installations must use the upgrade procedure below instead. Verify seeded model identifiers against your provider accounts before enabling them; seeded prices and credits are operator configuration, not provider price guarantees.
- Log into your Supabase Dashboard, select your project, and navigate to the SQL Editor.
- Step 1 (Run Schema): Open
SQL Files/schema.sql(orsupabase/schema.sql), copy its contents into the editor, and click Run. - Step 2 (Run Seed Data): Run
SQL Files/seed.sql(orsupabase/seed.sql) only on the new database. Review plans, models, and configured costs before production use.
UPDATE.md. Run the complete supabase/upgrade.sql bundle, not only the original archive migration. Never rerun fresh-install seed data on a live database.
Existing-Installation Upgrade
- Test on staging. Back up source, your private
.env, the database, and Supabase Storage objects. A database backup alone does not back up ZIP files. - Stop frontend and backend processes. Confirm all Supabase credentials refer to the same intended project.
- Run
SQL Files/upgrade.sqlorsupabase/upgrade.sqlin that project's SQL Editor. It contains the archive, security/payment, policy, ledger/count, catalog-search, and author-name migrations. - Copy the contents of the
updatepackage into your existing app root. Keep your.env; merge any customized source files before overwriting. Checkupdate-manifest.jsonfor the file list and SHA-256 hashes. - Run
npm ci. Before removing old sandboxes, runnpx tsx scripts/backfill-marketplace-archives.ts YOUR_SUPABASE_PROJECT_REFwith the matching local configuration. Review the result: old listings with already-deleted source cannot be recovered without restoring that source or an archive. - Remove only the generated
.nextdirectory while processes are stopped, runnpm run build, and restart both processes using your process manager. - Verify catalog search and filters, seller publication, buyer downloads, private Storage permissions, read-only demo access, and Stripe test-mode checkout/webhook fulfillment before reopening access.
The complete bundle is guarded for reruns on the supported original Clawder schema. If you instead apply individual migrations, apply them in filename order and do not combine both procedures unnecessarily. The upgrade does not reseed your plans or pricing.
Creating the First Admin User
Clawder does not ship with a default administrator password. After deploying the app, create your first account through the normal sign-up flow, then promote that account manually in Supabase.
UPDATE public.profiles
SET is_admin = true
WHERE email = '[email protected]';
Replace [email protected] with your real administrator email address. Log out and back in after running the query so the admin navigation and permissions refresh.
Payments & Pricing Plans
Clawder is designed to be completely dynamically driven by your Supabase database. You do not need to manually create Stripe products or edit React code to change your subscription tiers, features, or limits!
Fully Automated Stripe Provisioning
When setting up your plans table in Supabase, leave the stripe_product_id and stripe_price_id columns completely empty.
Once a user attempts to subscribe to a plan for the very first time, Clawder's backend engine will automatically communicate with Stripe, dynamically provision the exact Product and recurring Price based on your database settings, and securely save the generated IDs back into your database. It is 100% hands-off.
Editing Features & Limits
You can change what is displayed on the frontend Pricing page, the AI usage limits, and the offer (badge/coupon) two different ways: directly in the Supabase Dashboard, or with no SQL at all from the built-in Admin Panel. Choose the method you prefer:
To change what is displayed on the frontend Pricing page or adjust the AI usage limits, open your Supabase Dashboard, go to the Table Editor, and edit the plans table.
The features Array
This column stores an array of text strings (e.g., ["Unlimited Chat", "Advanced Analytics", "Priority Support"]). Whatever you put in this array is immediately fetched and beautifully rendered on the live Pricing page. There are absolutely no code changes required.
The limits JSONB
This column strictly dictates exactly what AI models and capabilities the user has access to. It must be valid JSON.
{
  "modes": [
    "ask",
    "agent",
    "swarm"
  ],
  "models": [
    "gemini-2.5-flash",
    "gemini-2.5-pro"
  ],
  "custom_agents": true,
  "can_download_zip": true
}featuresexpects a JSON array of strings — edit it in the Supabase JSON editor to avoid quote-escaping mistakes.limitsis a JSONB object; only the models listed inmodelswill be shown to that plan's users.offeris a JSONB object used for promo badges and coupon codes (e.g.{"active": true, "badge": "90% OFF", "coupon_code": "YOUR_CODE", "price_monthly": 100}). Set it toNULLto remove any promo from a plan.- Keep the
idcolumn unchanged unless you intentionally want a brand-new tier (see Pro Tip below).
No SQL required. Log in as an administrator, open Admin Panel > Plans (/admin/plans), and click the Edit button on any plan. The form is grouped into clear sections that mirror the database columns:
Plan Information & Pricing
- Name, Tier, ID — display name and internal id of the plan.
- Credits & Price — monthly credits and price (set to
0for the Free plan). - Stripe IDs — leave
stripe_product_id/stripe_price_idempty; they are auto-provisioned on first checkout.
Features, Limits & Offer
- Features List — add/remove the bullet points shown on the Pricing page.
- Limits Configuration — check the AI modes and models this plan can access, plus toggles for custom agents and ZIP downloads.
- Offer Settings (Optional) — enable a promo badge, discount price, and coupon code for that plan.
plans table — the Pricing page and backend limits update immediately, exactly as if you had edited the row manually.
Platform Default Fallback Model
The AI Agent engine and workspace automatically adopt whichever model is marked with is_default = true in your models table (initially configured as gemini-2.5-flash).
Select "Set as Platform Default Fallback" for an active, accessible model. The partial unique index permits at most one default; it does not guarantee one exists. After a failed model save, verify the selected default and plan assignments before accepting new builds.
plans table. It will instantly appear on your website!
App Marketplace Setup
Clawder includes a fully integrated app marketplace where your users can build full applications with AI and sell them to other users. This section covers everything you need to configure for the marketplace to work.
Marketplace Database Tables
The marketplace database structure is automatically set up when you execute schema.sql during Step 1 of the Database Setup. The schema creates the following tables:
marketplace_listings
Stores app details, status, ratings, and the path to each listing's published ZIP in private Supabase Storage.
marketplace_reviews
Stores ratings (1-5) and review comments per listing, linked to the reviewer's profile.
marketplace_purchases
Records the buyer, download token, and archive path captured at purchase time, so later edits or deletion of the seller's project do not change the buyer's ZIP.
payout_requests
Stores withdrawal requests: seller ID, amount, payout method (paypal/bank), status (pending/completed/rejected), and timestamps.
profiles (extended)
Four marketplace columns are added: marketplace_balance (earnings awaiting withdrawal), payout_method ('paypal' or 'bank'), paypal_email, and bank_details.
The SQL file also creates Row Level Security (RLS) policies for marketplace tables: published listings are public, buyers see their own purchases, and users manage their own payout requests. Listing writes go through authenticated server endpoints so clients cannot replace archive paths. After running the schema, verify the policies are active in your Supabase Dashboard under Authentication > Policies.
Stripe Marketplace Configuration
The marketplace uses the same webhook endpoint you already set up for SaaS billing. You do not need to create a new webhook. The handler automatically detects whether a session is a marketplace purchase or a SaaS subscription and processes it accordingly.
https://yourdomain.com/api/stripe/webhook) from the SaaS billing setup already handles marketplace purchases. If you create a duplicate webhook, Stripe may fire events twice and cause conflicts. Edit your existing endpoint instead.
- Go to your Stripe Dashboard > Webhooks.
- Find the webhook endpoint you created during the SaaS billing setup (
https://yourdomain.com/api/stripe/webhook) and click Edit. - Ensure the following events are selected:
checkout.session.completed— handles both SaaS subscriptions AND marketplace purchasesinvoice.paid— subscription billingcustomer.subscription.updated— plan changescustomer.subscription.deleted— cancellations
- Save the webhook. No additional setup is required — the same endpoint handles everything.
Configuring Platform Fee
The platform fee is set to 30% by default (sellers earn 70%). To change this percentage, update the hardcoded values in the source code. The fee calculation appears in these files:
src/server/lib/stripe.ts— Stripe checkout fee calculationsrc/components/PublishModal.tsx— publish wizard earnings displaysrc/app/marketplace/dashboard/page.tsx— author dashboard earnings displaysrc/app/admin/marketplace/page.tsx— admin marketplace stats label
Search for 0.30 and 0.70 in the codebase to find every location. Creators see their earnings calculated in real-time during the publish flow.
Marketplace ZIP Delivery
When a seller publishes an app, Clawder creates its ZIP from the project sandbox and saves it in the private marketplace-archives Supabase Storage bucket. Purchases retain the archive path. Authenticated buyers download from Storage through the backend, even if the seller later deletes the project or E2B sandbox.
- Run the updated
schema.sqlfor a new database, or the fullsupabase/upgrade.sqlbundle for an existing installation. Keep themarketplace-archivesbucket private; do not add public read policies. - Set
E2B_API_KEYand the server-sideSUPABASE_SERVICE_ROLE_KEYin.env. Publishing requires an accessible project sandbox and fails if the ZIP cannot be stored. The ZIP limit is 50 MB. - The backend checks the buyer's login and completed purchase before serving the saved ZIP. Generated dependencies and common secret files are excluded from the archive. No manual seller upload is needed.
Buyer library: Completed acquisitions appear in the buyer's Downloads view. A purchase retains its saved archive version even when a seller refreshes the listing archive later. Deleting a source project or sandbox does not delete that Storage object. Manually deleting archives, purchase records, or the Storage bucket can still break downloads; maintain separate backups.
Seller updates: Edit listing metadata from the author dashboard. Refreshing the downloadable ZIP requires an accessible source project and an explicit archive update. Earlier purchases keep their acquired version.
Catalog and badges: Search, categories, price bounds, sort order, pagination, and grid/list views work together. Paid sales, free acquisitions, and repeated file downloads are distinct. Author milestone badges derive from recorded sales, acquisitions, and ratings; missing profile names use a distinct privacy-safe fallback, not an email address.
Payout System Setup
Sellers can withdraw their earnings via PayPal or Bank Transfer. The payout system is already built into the author dashboard.
- PayPal: Sellers enter their PayPal email in the author dashboard. Minimum withdrawal: $50.
- Bank Transfer: Sellers enter their bank details (IBAN, routing, account info) in the author dashboard. Minimum withdrawal: $250.
- Admin Payout Management & Notification Badges: Payout requests are immediately displayed on the dedicated Admin Panel > Payout Requests (
/admin/payouts) with real-time pending notification badges across the admin sidebar. As the platform owner, you can copy the seller's PayPal address with 1-click, transfer the requested amount, and click "Mark Paid" (which marks the status ascompleted). - Automatic Refund Protection: If you reject a withdrawal request via the admin panel ("Reject & Refund"), the requested funds are instantly and automatically refunded back to the author's
marketplace_balance. - Balance tracking: After confirmed payment fulfillment, the seller is credited with the configured allocation (70% by default, not net of all external fees). Withdrawal requests reserve funds pending admin review. Rejection returns the reserved balance; this is not a Stripe customer refund.
Build & Launch
With the database ready and your environment variables securely in place, it's time to build the application.
First, install all required dependencies (including Playwright for the autonomous web-browsing agents), then compile the Next.js app, and start the PM2 daemon to keep it online forever:
# 1. Install core dependencies
npm install

# 2. Install Playwright browser dependencies for autonomous agents
npx playwright install
npx playwright install-deps

# 3. Build the Next.js production bundle
npm run build

# 4. Boot the backend and frontend using PM2
pm2 start npm --name "clawder-backend" -- run dev:server
pm2 start npm --name "clawder-frontend" -- start

# 5. Save the PM2 state to resurrect on server reboot
pm2 save
pm2 startup
Customization & SEO
Clawder is designed to be completely white-labeled. You own the code, so you can transform it into your own brand.
Vibe Coding (AI-Assisted Customization)
You don't need to be an expert developer to modify this application. The codebase is strictly typed and built with Next.js & TailwindCSS, making it incredibly easy for modern "Vibe Coding" AI tools to understand and modify it for you. We highly recommend using these tools to tweak the design, rewrite landing page copy, or even add entire new features simply by asking in plain English:
Cursor IDE →
The world's most popular AI code editor. Simply open the folder in Cursor and press CMD+I to tell the AI to "Change the primary color to red" or "Rewrite the landing page hero section."
Antigravity →
Google's advanced agentic coding assistant. Perfect for massive architectural changes, debugging complex backend issues, or deeply investigating the infrastructure.
Claude Code →
Anthropic's powerful CLI tool. Run it directly in your terminal to instantly analyze the codebase and have Claude rewrite UI components or fix bugs autonomously.
Manual Branding & SEO Setup
If you prefer to make modifications manually, here are the critical files you need to update to launch your SaaS:
Search Engine Optimization
- Open
src/app/layout.tsx. - Locate the Next.js
export const metadataobject at the top of the file. - Change the
titleanddescriptionto your own SaaS name. - Update the OpenGraph image (
og:image) to ensure rich link previews on Twitter and Discord.
UI & Branding
- Replace
public/logo.pngandpublic/favicon.icowith your own brand assets. - Open
tailwind.config.tsto modify the global color palette (e.g., changing primary colors). - Update the landing page copy in
src/app/page.tsxto fit your marketing strategy.
Logos & Icons
Replace the files in public/ such as logo-white.png, favicon.ico, and the app icon assets with your own brand files.
OpenGraph Assets
Replace public/og-image.jpeg and update metadata in src/app/layout.tsx so shared links show your own branded preview image and copy.
Nginx & Architecture Endpoints
Clawder requires Nginx to act as a reverse proxy, forwarding traffic dynamically to either the Frontend (port 3002) or Backend (port 3001).
Frontend Route (/)
Serves the Next.js application on port 3002 and aggressively caches static chunks.
Backend API (/api/*)
Routes to Express on port 3001. Handles REST integrations and server-side logic.
WebSockets (/ws)
Crucial. Connects to 3001 to stream real-time AI responses using Upgrade: websocket.
Webhooks (/api/stripe/webhook)
Direct pipeline for Stripe events. Unbuffered to prevent signature verification failures.
1. DNS Setup (Pointing Your Domain)
Before configuring Nginx, you must point your domain name to your VPS IP address. Log into your domain registrar (e.g., Namecheap, Cloudflare, or GoDaddy) and configure your DNS settings as follows:
For beginners: Need step-by-step visual help? Read this official guide from Cloudflare on How to create DNS records.
2. Nginx Server Block
Below is the "Virgin" Nginx configuration (without SSL enabled yet). Create this file at /etc/nginx/sites-available/yourdomain.com, link it to sites-enabled, and restart Nginx.
server_name yourdomain.com www.yourdomain.com; with your actual domain names. If you only want to support a single domain without the "www", just enter it once (e.g., server_name yourdomain.com;).
upstream backend {
    server localhost:3001;
    keepalive 32;
}

upstream frontend {
    server localhost:3002;
    keepalive 32;
}

proxy_cache_path /var/cache/nginx/clawder
    levels=1:2
    keys_zone=clawder_static:10m
    max_size=1g
    inactive=60m
    use_temp_path=off;

map $http_upgrade $connection_upgrade {
    default upgrade;
    ''      close;
}

server {
    listen 80;
    server_name yourdomain.com www.yourdomain.com; # Replace with your domain

    client_max_body_size 50M;
    gzip on;
    gzip_types text/plain text/css application/json application/javascript image/svg+xml application/xml font/woff2;

    location = /api/stripe/webhook {
        proxy_pass http://backend/api/stripe/webhook;
        proxy_http_version      1.1;
        proxy_set_header Connection "";
        proxy_request_buffering off;
        proxy_buffering         off;
        proxy_set_header Host              $host;
        proxy_set_header X-Real-IP         $remote_addr;
        proxy_set_header X-Forwarded-For   $proxy_add_x_forwarded_for;
        proxy_set_header X-Forwarded-Proto $scheme;
    }

    location /api/ {
        proxy_pass http://backend/api/;
        proxy_http_version      1.1;
        proxy_set_header Connection "";
        proxy_set_header Host              $host;
        proxy_set_header X-Real-IP         $remote_addr;
        proxy_set_header X-Forwarded-For   $proxy_add_x_forwarded_for;
        proxy_set_header X-Forwarded-Proto $scheme;
        proxy_read_timeout    300s;
        proxy_connect_timeout 300s;
    }

    location /ws {
        proxy_pass http://backend/ws;
        proxy_http_version 1.1;
        proxy_set_header Upgrade           $http_upgrade;
        proxy_set_header Connection        $connection_upgrade;
        proxy_set_header Host              $host;
        proxy_set_header X-Real-IP         $remote_addr;
        proxy_set_header X-Forwarded-For   $proxy_add_x_forwarded_for;
        proxy_set_header X-Forwarded-Proto $scheme;
        proxy_read_timeout  86400s;
        proxy_send_timeout  86400s;
        proxy_buffering     off;
        tcp_nodelay         on;
    }

    location /_next/static {
        proxy_pass http://frontend/_next/static;
        proxy_http_version 1.1;
        proxy_set_header Connection "";
        proxy_cache        clawder_static;
        proxy_cache_valid  200 60m;
        proxy_cache_use_stale error timeout updating http_500 http_502 http_503 http_504;
        add_header Cache-Control "public, max-age=31536000, immutable";
        add_header X-Cache-Status $upstream_cache_status;
    }

    location / {
        proxy_pass http://frontend;
        proxy_http_version 1.1;
        proxy_set_header Upgrade           $http_upgrade;
        proxy_set_header Connection        $connection_upgrade;
        proxy_set_header Host              $host;
        proxy_set_header X-Real-IP         $remote_addr;
        proxy_set_header X-Forwarded-For   $proxy_add_x_forwarded_for;
        proxy_set_header X-Forwarded-Proto $scheme;
    }
}sudo certbot --nginx -d yourdomain.com -d www.yourdomain.com to automatically generate your SSL certificates and lock the entire site to HTTPS.
Troubleshooting & FAQ
WebSocket Connection Fails
Confirm Nginx forwards /ws to the backend port, includes Upgrade and Connection headers, and that NEXT_PUBLIC_BACKEND_URL points to your public HTTPS domain.
Stripe Webhook Errors
Use the raw request body route, copy the live webhook signing secret into STRIPE_WEBHOOK_SECRET, and enable the required events listed in the Stripe setup section.
Sandbox Connectivity
Verify E2B_API_KEY, server outbound internet access, and workspace permissions. If sandboxes start but previews fail, check that the preview port is exposed and the agent project installed its dependencies. Failed reconnects preserve the saved sandbox ID; retry after resolving the provider issue. A killed sandbox is not silently replaced with an empty project: restore your source from backup or create a new project explicitly. Local builder sessions and archive snapshots share a lifecycle lease so one disconnect does not prematurely pause another operation.
These leases coordinate operations within one backend process. Multiple backend replicas need shared lifecycle coordination or sticky project routing. If pausing fails during a provider outage, the configured auto-pause is the fallback, not a promise of immediate capacity release. If sandbox deletion fails, the project reference is kept so you can retry; deleting a source project does not remove saved marketplace ZIPs or independently published websites.
Admin Access Missing
Make sure the first admin account was promoted with is_admin = true in Supabase, then sign out and back in to refresh the profile claims used by the UI.
Marketplace Listings Fail to Load
Check server logs for missing catalog functions or columns. Apply the full upgrade bundle to the same project configured by the frontend and backend. A URL from one Supabase project with keys from another is not a valid configuration. Never expose the service-role key in the browser.
ZIP Unavailable After an Upgrade
Verify the acquisition is completed and its private archive object exists. Backfill legacy listings before deleting their source sandboxes. Restore a backed-up ZIP or source if already missing; new migrations cannot recreate deleted files.
Sandbox Capacity Reached
E2B limits active sandboxes by account. Paused projects can resume when capacity is available. A waiting screen is not a guarantee of a durable, ordered queue. Monitor concurrency and runtime separately; upgrade provider capacity when measured demand requires it.
Free Builds Per Day
There is no included fixed daily free-build-count setting. Credits and model access are separate controls, not a daily build limiter. A daily count cap requires additional development.
Admin Panel & Moderation
Real administrators have is_admin = true in profiles. The separately identified demo administrator has read-only access: sensitive fields are redacted, write controls are disabled, and server-side authorization rejects mutations. The demo button fills sign-in fields; it does not create a production administrator. Use a dedicated demo account with no real funds or customer privileges.
1. Global Dashboard
The Global Dashboard (/admin) provides a birds-eye view of your entire platform's health. When you first log in as an admin, this is what you'll see.
- Top Statistics Grid:
- Total Users: The total number of registered accounts on your platform.
- Total Projects: The total number of apps and sandboxes generated by users.
- Estimated MRR: A monthly recurring revenue estimate based on current plan assignments, not actual Stripe cash receipts.
- Total LLM Cost: The aggregate cost you've incurred from LLM API calls (OpenAI, Anthropic, Google).
- Free-Plan AI Cost/User: Average recorded AI cost for free-plan users, not marketing customer-acquisition cost.
- Total Tokens Processed: The raw number of tokens your platform has pushed through AI models.
- Charts & Activity: Below the stats grid, you will find an Interactive Profit Margin Chart (tracking revenue vs LLM costs over time) and a Live Recent Activity Feed showing the latest user signups.
2. Users Management
The Users Management page (/admin/users) is your CRM. It lists every user in a searchable table. You can track exact global stats at the top (Total Admins, Active 7d Users, Free Users, Paid Users).
How to manage users: Click the Edit (Pencil) button on any user row to open the User Management Drawer. You can edit the following fields:
- Account & Security: Manually change their email address, toggle their Admin privileges (grant or revoke
is_admin), or change their status tosuspendedto ban them from the platform. - Billing & Plan: Manually upgrade or downgrade their
Current PlanandPending Plan. You can instantly overwrite their Credits Limit (to give them free tokens) or reset their Credits Used. - Referrals: View or edit their custom referral code and see who referred them.
- Marketplace & Payouts: Adjust their available Marketplace Balance, select their preferred Payout Method (PayPal or Bank Transfer), and set their Payout Email.
3. Projects Management
The Projects Management page (/admin/projects) allows you to monitor exactly what apps your users are building. The top stats track Agent Projects, Swarm Projects, Deployed (Vercel) apps, and Active (7d) apps.
How to manage projects: Click the Edit (Pencil) button on any project to open the Project Drawer. You can edit:
- Core Details: Rename the project. (Project ID and User ID are read-only for security).
- Infrastructure: Monitor the Sandbox ID. If a user's cloud VM is stuck, you can change the Sandbox Status (Pending, Running, Stopped, Error).
- AI Settings: Change the project's orchestration mode (Agent, Swarm, Ask), toggle Thinking Enabled (advanced reasoning), and adjust the context Compression Level (Micro, Caveman, Genome).
- Links: Update or fix broken deployment URLs (GitHub, Vercel, Netlify, Preview URLs).
4. Models & Pricing
The Models Management page (/admin/models) allows you to control your AI costs dynamically without touching any code.
How to manage models: Click "Add New Model" or edit an existing one. You can configure:
- Model ID & Name: Use the actual provider API identifier and an accurate display name; for example
gemini-2.5-flashand "Gemini 2.5 Flash". - Provider: Use the implemented OpenAI, Anthropic, or Google adapter. Selecting a name alone does not add an unsupported provider.
- Cost Input/Output: Enter the exact API cost per 1M tokens (e.g., $2.50 Input, $15.00 Output). This tracks your expenses accurately in the financials tab.
- Burn Multiplier: This is crucial. If you set this to
x10, the user will burn 10 credits for every 1 credit they normally would. Use this to protect your profit margins on expensive models. - Plan Availability: Check the boxes (Free, Pro, Business) to decide which subscription tiers have access to this model.
5. Marketplace Moderation
The Marketplace Management page (/admin/marketplace) tracks the creator economy of your platform. The top stats track Total Listings, Total Sales, Total Volume, and your Platform Earnings.
How to manage marketplace apps: You can click the Edit button on any listing to moderate it:
- Live Preview: Instead of a static image, the admin table renders a live scaled iframe of the deployed app so you can test it instantly.
- Core Info & Pricing: Edit the Title, Slug, Description, and Price (USD).
- Status Control: If an app is low quality, change its status from
publishedtosuspendedto instantly hide it from the public marketplace.
6. Financials & Revenue
The Financials page (/admin/financials) provides operational usage and cost analytics. Its estimates are not a reconciled Stripe accounting ledger. Only a real administrator can access permitted management actions; demo access remains read-only.
- Cost Over Time: A beautiful Area Chart showing daily/monthly LLM costs.
- Cost by Model: A Pie Chart breaking down which models (e.g., Sonnet vs GPT-4) are costing you the most.
- Top Burners: A Bar Chart highlighting your Top 10 Users by LLM cost. If someone is abusing the system, you can find them here and suspend them via the Users tab.
- User and Plan Analysis: Review recorded usage and configured plan economics. Review seller withdrawals separately in
/admin/payouts; reconcile actual charges, refunds, and transfers against your provider records.
Support & Contact
Thank you for purchasing Clawder! We are deeply committed to providing you with the best possible experience. Please review our support channels and policies below.
Installation Assistance
Need help deploying to your VPS or configuring Nginx? Our team is available to guide you through the process.
Open Support Ticket →General Inquiries
For bug reports, feature requests, or any other questions not related to installation, please reach out via email.
[email protected] →Additional Services: Monzed offers free installation with an Extended License purchase. Custom rebranding, new functionality, and third-party integrations such as Paddle, Mistral, KIMI, or GLM are quoted separately. Please contact our support team to arrange these services.
Updates & Changelog
v1.1.0 - 5 October 2026: Persistent private marketplace archives and buyer Downloads; payment and payout authorization hardening; activity-based counts and author badges; catalog search/filter/pagination improvements; live-first product previews; profile-name synchronization; read-only demo administration and redaction. Includes seven database migrations, a complete upgrade bundle, and an overwrite update folder inside the single Codester download.
v1.0.0 — Initial Release
How to Install Future Updates
Download available updates from your customer account. Follow the supplied instructions and test on staging before updating a live installation.
- Every update will include an Update Instructions document detailing exactly what changed.
- Back up first, stop application processes, preserve
.env, and merge customizations before overwriting updated source files. - If the update requires database changes, we will attach a specific SQL script for you to run in your Supabase SQL Editor.
UPDATE.md. Keep backups and plan a maintenance window; no upgrade is guaranteed to be risk-free.
Credits & Third-Party Assets
Clawder includes original application source and depends on separately licensed software. Direct dependencies and versions are recorded in package.json and package-lock.json. Install dependencies with npm ci and retain the applicable upstream copyright and license notices when redistributing a customized build.
The documentation references IBM Plex fonts, Font Awesome icons, and Prism syntax highlighting from their upstream CDNs. These resources and provider trademarks remain the property of their respective owners; provider references describe integrations and do not imply endorsement.
Workflow screenshots illustrate the application, with admin captures taken from a read-only, redacted demo. Separately sold applications shown in marketplace previews are not bundled marketplace purchases. Operators must obtain rights for any third-party application source, image, logo, or other asset they publish or redistribute. A platform purchase does not grant rights to unrelated preview assets.
Production deployment still requires testing, external service accounts, and appropriate licenses. Codester's Regular License covers one personal or commercial project without resale or source distribution. Extended covers multiple projects and permits source distribution within a larger project; neither allows resale as-is. See Codester's license terms.